Health Assessment, Part Three: Physical Health Assessment – Systems-Based/Focused Assessment
Amy McCrystal and Jessica Best
Learning Outcomes
In this chapter you will learn how to:
- Define a systems-based/focused assessment and explain its purpose in patient care
- Perform a systems-based/focused assessment using appropriate techniques
- Analyse the findings from a systems-based/focused assessment to inform the development of a nursing care plan.
A “head-to-toe approach” is used by nurses and refers to a comprehensive assessment that systematically examines a patient’s entire body, from the top of their head to the tips of their toes, to thoroughly assess their overall health status and identify any potential issues.
Neurological Assessment
The physical examination of the neurological system includes assessment of the central and peripheral nervous systems. A routine neurological exam usually starts by assessing the patient’s mental status followed by evaluation of sensory function and motor function. Comprehensive neurological exams may further evaluate cranial nerve function and deep tendon reflexes.
Assessing Mental Status
Routine assessment of a patient’s mental status by registered nurses includes evaluating their level of consciousness, overall appearance, behaviour, affect and mood, speech, and cognitive performance.
Level of consciousness refers to a patient’s level of arousal and alertness. Assessing a patient’s orientation to time, place, and person is a quick indicator of cognitive functioning. Level of consciousness is typically evaluated on admission to a facility to establish a patient’s baseline status, and it is then frequently monitored every shift for changes in condition. To assess a patient’s orientation status, ask, “What is your name? Where are you? What day is it?” If the patient is unable to recall a specific date, it may be helpful to ask them the day of the week, the month, or the season to establish a baseline of their awareness level.
A normal level of orientation is typically documented as, “Patient is alert and oriented to person, place, and time,” or by the shortened phrase, “Alert and oriented x 3.” If a patient is confused, an example of documentation is, “Patient is alert and oriented to self, but disoriented to time and place.”
There are many screening tools that can be used to further objectively assess a patient’s mental status and cognitive impairment. Common screening tools used frequently by registered nurses to assess mental status include the Glasgow Coma Scale, the National Institutes of Health Stroke Scale (NIHSS), and the Mini-Mental State Exam (MMSE).
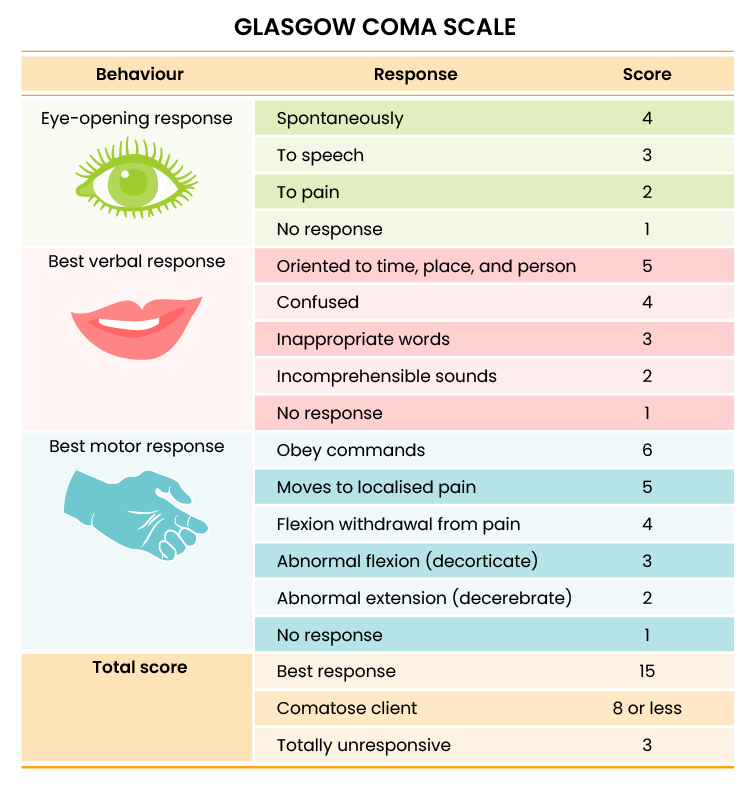
Glasgow Coma Scale
The Glasgow Coma Scale (GCS) is a standardised tool used to objectively assess and continually monitor a patient’s level of consciousness when damage has occurred, such as after a head injury or a cerebrovascular accident (stroke). Three primary areas assessed in the GCS include the eye-opening response, verbal response, and motor response (Figure 1). Scores are added from these three categories to assign a patient’s level of responsiveness. Scores ranging from 15 or higher are classified as the best response, less than 8 is classified as comatose, and 3 or less is classified as unresponsive.
Assessing Motor Strength
A brief musculoskeletal assessment is performed as part of the neurological assessment to determine the neurological stimulation of bilateral strength. Unequal extremity motor strength can indicate underlying neurological disease or injury. Assessing motor strength includes comparing bilateral hand grasps, upper extremity strength, and lower extremity strength. Keep in mind that extremities on the dominant side are usually slightly stronger than the nondominant side.
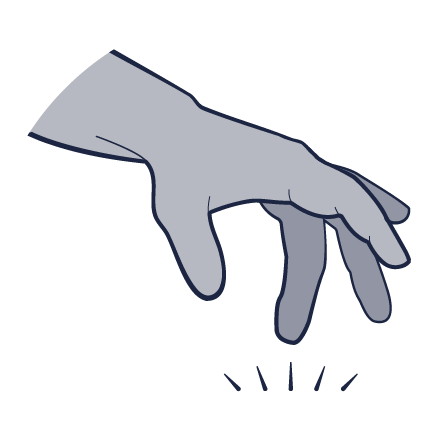
Hand Grasps
To perform a hand grasp test, extend two fingers on both hands toward the patient. Ask the patient to squeeze both of your hands and compare for similar bilateral strength. An example of this is provided in Figure 5 below.
Upper Extremity Strength
To test upper extremity strength, ask the patient to extend their forearms with palms facing upwards. Place your hands on their inner forearms and ask them to pull their arms toward them while you provide resistance. An expected finding is the patient strongly bilaterally pulls against resistance with both arms.
An alternative test is to ask the patient to put their hands in the air with their palms facing you. Place your palms against theirs and ask them to push while you provide resistance.
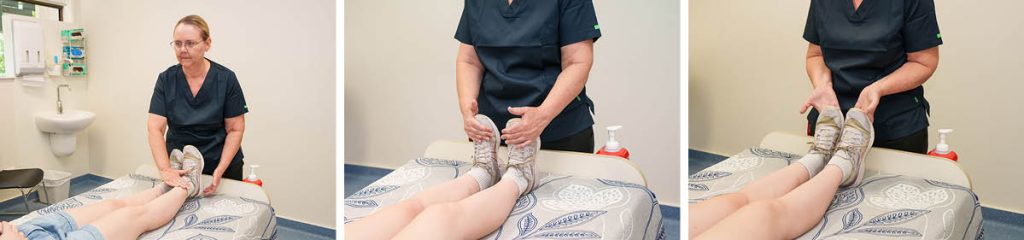
Lower Body Strength
To assess lower body strength while the patient is in a seated position, place your hands behind their calves. Ask them to pull backwards with their lower legs while you provide resistance in the opposite direction.
Alternative tests are to place your hands on the patient’s lower thighs and ask them to lift their legs upwards while you provide downward resistance or place your hands on the top of their feet and ask them to pull their toes upwards while you provide resistance. In a similar manner, you can also place your hands underneath their feet and ask them to press downwards “like pressing the gas pedal of a car,” while providing resistance. Compare lower extremity strength on both sides.
Assessing Pupil Response
The size, shape, and reactivity of the pupils are assessed during a neurological assessment as it can provide valuable information about a patient’s neurological status.
Pupil size and shape: Inspect both pupils for symmetry, size, and shape. Pupil size ranges from 1 mm (smallest) to 6 mm (largest). Normal pupils are round and equal in size. Unequal pupils can indicate neurological impairment due to pressure, hypoxia or injury to the brain.
Pupil reaction to light: Shine a light into each eye separately and observe the response. Both pupils should constrict briskly and equally in response to light. An absent (fixed) or slow (sluggish) response can indicate neurological damage due to pressure, hypoxia or injury to the brain.
| Expected Findings From the Inspection Stage of Assessment | Unexpected Findings (Document and notify provider if new finding*) |
|
|
| *Critical findings to report immediately and/or obtain emergency assistance: | Change in mental status, pupil responsiveness, facial drooping, slurred words or inability to speak, or sudden unilateral loss of motor strength |
Cardiovascular Assessment
Assessing the cardiovascular system includes performing several subjective and objective assessments. At times, assessment findings are modified according to lifespan considerations.
Subjective Assessment
The subjective assessment of the cardiovascular and peripheral vascular system is vital for uncovering signs of potential dysfunction. To complete the subjective cardiovascular assessment, the nurse begins with a focused interview. The focused interview explores past medical and family history, medications, cardiac risk factors, and reported symptoms. Symptoms related to the cardiovascular system include chest pain, peripheral oedema, unexplained sudden weight gain, shortness of breath (dyspnea), irregular pulse rate or rhythm, dizziness, or poor peripheral circulation. Any new or worsening symptoms should be documented and reported to the healthcare provider.
 |
SAFETY NOTE: If findings indicate current severe symptoms suggestive of myocardial infarction or another critical condition, suspend the remaining cardiovascular assessment and obtain immediate assistance according to agency policy.
|
Objective Assessment
The physical examination of the cardiovascular system involves the interpretation of vital signs, inspection, palpation, and auscultation of heart sounds as the nurse evaluates for sufficient perfusion and cardiac output. Inspection considerations are provided below:
Auscultation
Heart Sounds
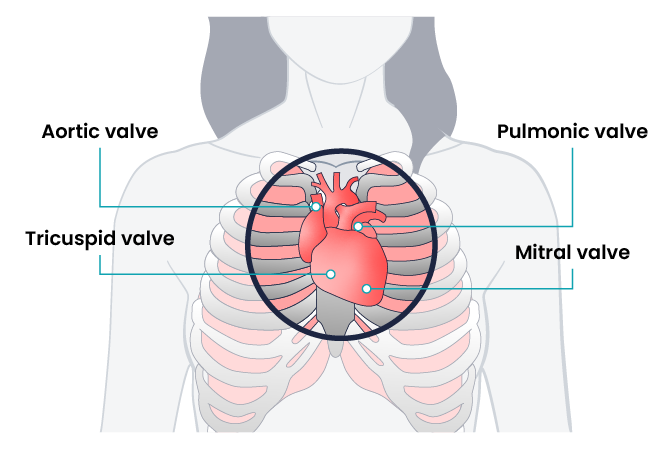
Auscultation is routinely performed over five specific areas of the heart to listen for corresponding valvular sounds. These auscultation sites are often referred to by the mnemonic “APE To Man,” referring to aortic, pulmonic, Erb’s point, tricuspid, and mitral areas. The aortic area is the second intercostal space to the right of the sternum. The pulmonic area is the second intercostal space to the left of the sternum. Erb’s point is directly below the pulmonic area and located at the third intercostal space to the left of the sternum. The tricuspid (or parasternal) area is at the fourth intercostal space to the left of the sternum. The mitral (also called apical or left ventricular area) is the fifth intercostal space at the midclavicular line.
Auscultation usually begins at the aortic area (upper right sternal edge). Use the diaphragm of the stethoscope to carefully identify the S1 and S2 sounds. They will make a “lub-dub” sound. Note that when listening over the area of the aortic and pulmonic valves, the “dub” (S2) will sound louder than the “lub” (S1). Move the stethoscope sequentially to the pulmonic area (upper left sternal edge), Erb’s point (left third intercostal space at the sternal border), and tricuspid area (fourth intercostal space. When assessing the mitral area for female patients, it is often helpful to ask them to lift their breast tissue so the stethoscope can be placed directly on the chest wall. Repeat this process with the bell of the stethoscope. The apical pulse should be counted over 60 seconds. For an adult, the heart rate should be between 60 and 100 with a regular rhythm to be considered within a normal range. The apical pulse is an important assessment to obtain before the administration of many cardiac medications.
The first heart sound (S1) identifies the onset of systole when the atrioventricular (AV) valves (mitral and tricuspid) close and the ventricles contract and eject the blood out of the heart. The second heart sound (S2) identifies the end of systole and the onset of diastole when the semilunar valves close, the AV valves open, and the ventricles fill with blood. S1 corresponds to the palpable pulse. When auscultating, it is important to identify the S1 (“lub”) and S2 (“dub”) sounds, evaluate the rate and rhythm of the heart, and listen for any extra heart sounds. An example of an extra heart sound is a murmur which is a blowing or whooshing sound that signifies turbulent blood flow often caused by a valvular defect. New murmurs not previously recorded should be immediately communicated to the medical staff.
Carotid Sounds
The carotid artery may be auscultated for bruits. Bruits are a swishing sound due to turbulence in the blood vessel and may be heard due to atherosclerotic changes.
Palpation
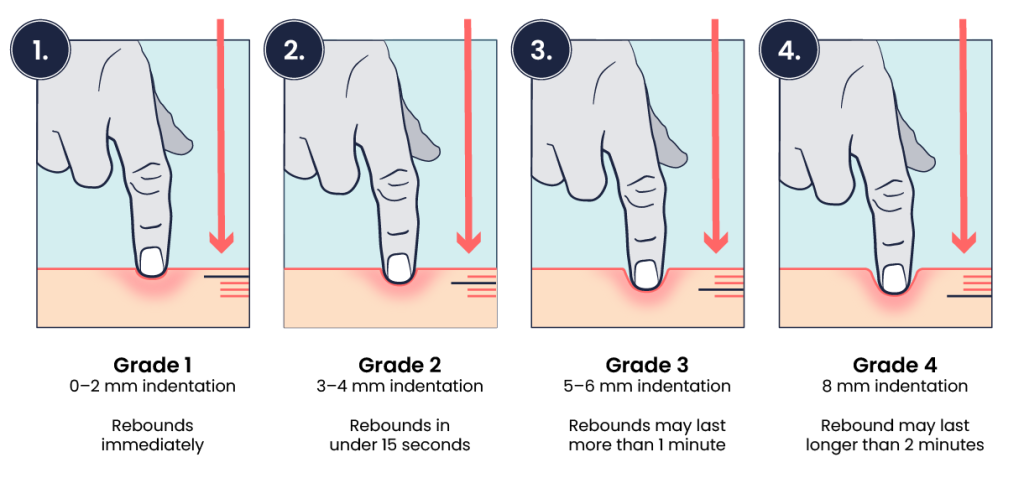
Palpation evaluates peripheral pulses, capillary refill, and oedema. When palpating these areas, also pay attention to the temperature and moisture of the skin.
Pulses
Compare the rate, rhythm, and quality of arterial pulses bilaterally, including the carotid, radial, brachial, posterior tibialis, and dorsalis pedis pulses. Bilateral comparison for all pulses (except the carotid) is important for determining subtle variations in pulse strength. Carotid pulses should be palpated on one side at a time to avoid decreasing perfusion of the brain. The posterior tibial artery is located just behind the medial malleolus. It can be palpated by scooping the patient’s heel in your hand and wrapping your fingers around so that the tips come to rest on the appropriate area just below the medial malleolus. The dorsalis pedis artery is located just lateral to the extensor tendon of the big toe and can be identified by asking the patient to flex their toe while you provide resistance to this movement. Gently place the tips of your second, third, and fourth fingers adjacent to the tendon, and try to feel the pulse. See Health Assessment, Part Two, figure 10 for pulse locations.
The quality of the pulse is graded on a scale of 0 to 3, with 0 being absent pulses, 1 being decreased pulses, 2 being within normal range, and 3 being increased (also referred to as “bounding”). If unable to palpate a pulse, additional assessment is needed. First, determine if this is a new or chronic finding. Second, if available, use a Doppler ultrasound to determine the presence or absence of the pulse. Many agencies use Doppler ultrasound to document if a nonpalpable pulse is present. If the pulse is not found, this could be a sign of an emergent condition requiring immediate follow-up with the medical team.
Capillary Refill
The capillary refill test is performed on the nail beds to monitor perfusion (the amount of blood flow to the tissue). Pressure is applied to a fingernail or toenail until it pales, indicating that the blood has been forced from the tissue under the nail. This paleness is called blanching. Once the tissue has blanched, pressure is removed. Capillary refill time is defined as the time it takes for the colour to return after pressure is removed. If there is sufficient blood flow to the area, a pink colour should return within three seconds after the pressure is removed.
| Assessment | Expected Findings | Unexpected Findings (Document and notify the provider if this is a new finding*) |
|
Inspection
|
Apical impulse may or may not be visible |
|
|
Palpation
|
Apical pulse felt over midclavicular fifth intercostal space |
|
|
Auscultation
|
S1 and S2 heart sounds in a regular rhythm |
|
|
*CRITICAL CONDITIONS to report immediately |
|
|


Respiratory Assessment
With an understanding of the basic structures and primary functions of the respiratory system, the nurse collects subjective and objective data to perform a focused respiratory assessment.
Subjective Assessment
Collect data using interview questions, paying attention to what the patient reports. The interview should include questions regarding any current and past history of respiratory health conditions or illnesses, medications, and reported symptoms. Consider the patient’s age, gender, family history, race, culture, environmental factors, and current health practices when gathering subjective data. The information discovered during the interview process guides the physical exam and subsequent patient education.
| Interview Questions |
Follow-up |
|
|
Additional questions and follow-up actions are displayed below.
Objective Assessment
A focused respiratory objective assessment includes interpretation of vital signs; inspection of the patient’s breathing pattern, skin colour, and respiratory status; palpation to identify abnormalities; and auscultation of lung sounds using a stethoscope. The nurse must understand what is expected for the patient’s age, gender, development, race, culture, environmental factors, and current health condition to determine the meaning of the data being collected.
Inspection
Inspection during a focused respiratory assessment includes observation of the level of consciousness, breathing rate, pattern and effort, skin colour, chest configuration, and symmetry of expansion.
Palpation
Palpation of the chest may be performed to investigate for areas of abnormality related to injury or procedural complications. For example, if a patient has a chest tube or has recently had one removed, the nurse may palpate near the tube insertion site to assess for areas of air leak or crepitus. Crepitus feels like a popping or crackling sensation when the skin is palpated and is a sign of air trapped under the subcutaneous tissues. If palpating the chest, use light pressure with the fingertips to examine the anterior and posterior chest wall. Chest palpation may be performed to assess specifically for growths, masses, crepitus, pain, or tenderness.
Confirm symmetric chest expansion by placing your hands on the anterior or posterior chest at the same level, with thumbs over the sternum anteriorly or the spine posteriorly. As the patient inhales, your thumbs should move apart symmetrically. Unequal expansion can occur with pneumonia, thoracic trauma, such as fractured ribs, or pneumothorax.
Auscultation
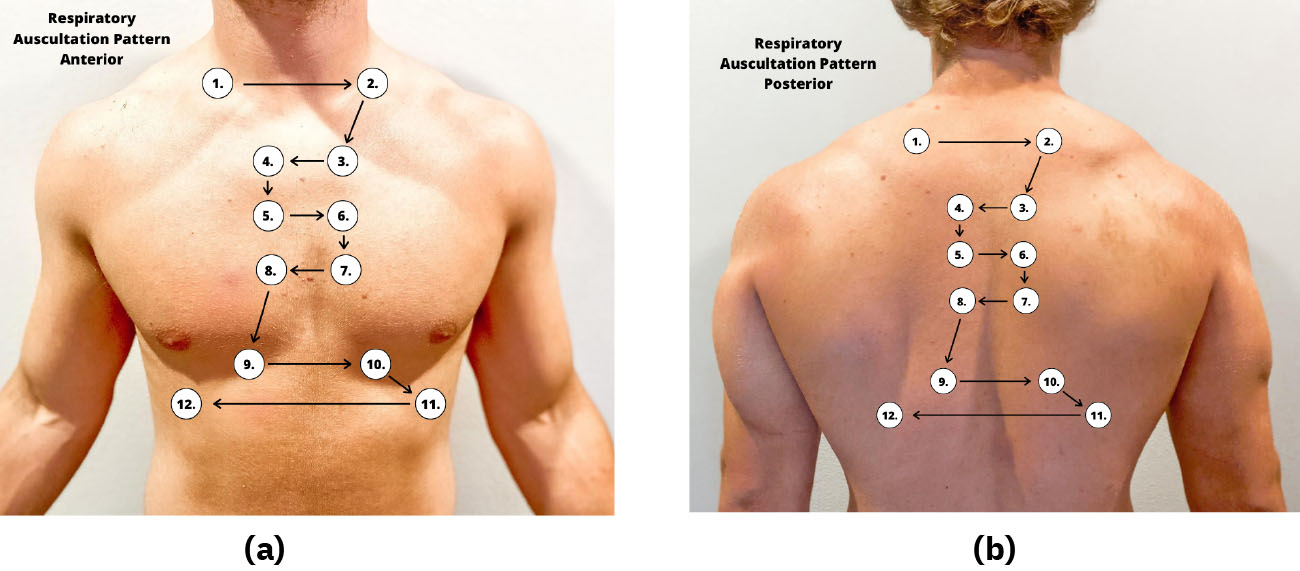
Using the diaphragm of the stethoscope, listen to the movement of air through the airways during inspiration and expiration. Instruct the patient to take deep breaths through their mouth. Listen through the entire respiratory cycle because different sounds may be heard on inspiration and expiration. Allow the patient to rest between respiratory cycles, if needed, to avoid fatigue with deep breathing during auscultation. As you move across the different lung fields, the sounds produced by airflow vary depending on the area you are auscultating because the size of the airways changes.
Listen to normal breath sounds on inspiration and expiration.
Accurate and Quality Assessment
Correct placement of the stethoscope during auscultation of lung sounds is important to obtain a quality assessment. The stethoscope should not be placed over clothes or hair because these may create inaccurate sounds from friction. The best position to listen to lung sounds is with the patient sitting upright; however, if the patient is acutely ill or unable to sit upright, turn them side to side in a lying position. Avoid listening over bones, such as the scapulae or clavicles or over the female breasts to ensure you are hearing adequate sound transmission. Listen to sounds from side to side rather than down one side and then down the other side. This side-to-side pattern allows you to compare sounds in symmetrical lung fields. See Figure 4 for landmarks of stethoscope placement over the anterior and posterior chest wall.
Expected Breath Sounds
It is important upon auscultation to have awareness of expected breath sounds in various anatomical locations.
- Bronchial breath sounds are heard over the trachea and larynx and are high-pitched and loud.
- Bronchovesicular sounds are medium-pitched and heard over the major bronchi.
- Vesicular breath sounds are heard over the lung surfaces, are lower-pitched, and are often described as soft, rustling sounds.
Adventitious Lung Sounds
Adventitious lung sounds are sounds heard in addition to normal breath sounds. They most often indicate an airway problem or disease, such as accumulation of mucus or fluids in the airways, obstruction, inflammation, or infection. These sounds include rales/crackles, rhonchi/wheezes, stridor, and pleural rub:
- Coarse crackles, also called rhonchi, are low-pitched, loud, continuous sounds frequently heard on expiration. They are a sign of turbulent airflow through secretions in the large airways.
- Fine crackles, also called rales, are popping or crackling sounds heard on inspiration. They occur in association with conditions that cause fluid to accumulate within the alveolar and interstitial spaces, such as heart failure or pneumonia. Fine crackles are soft, high-pitched, and very brief. For this reason, it is essential to listen to lung sounds with the stethoscope placed on the patient’s skin and not over their clothing or hospital gown. The sound is like that produced by rubbing strands of hair together close to your ear.
- Wheezes are whistling-type noises produced during expiration (and sometimes inspiration) when air is forced through airways narrowed by bronchoconstriction or associated mucosal oedema. For example, patients with asthma commonly have wheezing.
- Stridor is heard only on inspiration. It is associated with mechanical obstruction at the level of the trachea/upper airway.
- Pleural rub may be heard on either inspiration or expiration and sounds like the rubbing together of leather. A pleural rub is heard when there is inflammation of the lung pleura, resulting in friction as the surfaces rub against each other.
Percussion
Percussion is an advanced respiratory assessment technique used by advanced practice nurses and other healthcare providers to gather additional data on the underlying lung tissue. By striking the fingers of one hand over the fingers of the other hand, a sound is produced over the lung fields that helps determine if fluid is present. Dull sounds are heard in high-density areas, such as pneumonia or atelectasis, whereas clear, low-pitched, and hollow sounds are heard in normal lung tissue.
| Assessment | Expected Findings | Unexpected Findings (Document and notify the provider if a new finding*) |
| Inspection
|
Work of breathing effortless
Regular breathing pattern Respiratory rate within normal range for age Chest expansion symmetrical Absence of cyanosis or pallor Absence of accessory muscle use, retractions, and/or nasal flaring Anteroposterior: transverse diameter ratio 1:2 |
Laboured breathing
Irregular rhythm Increased or decreased respiratory rate Accessory muscle use, pursed-lip breathing, nasal flaring (infants), and/or retractions Presence of cyanosis or pallor Asymmetrical chest expansion Clubbing of fingernails |
| Palpation
|
No pain or tenderness with palpation. Skin warm and dry; no crepitus or masses | Pain or tenderness with palpation, crepitus, palpable masses, or lumps |
| Percussion
|
Clear, low-pitched, hollow sound in normal lung tissue | Dull sounds heard in high-density areas, such as pneumonia or atelectasis |
| Auscultation
|
Bronchovesicular and vesicular sounds heard over appropriate areas
Absence of adventitious lung sounds |
Diminished lung sounds
Adventitious lung sounds, such as fine crackles/rales, wheezing, stridor, or pleural rub |
*CRITICAL CONDITIONS to report immediately  |
Decreased oxygen saturation <92%
Pain Worsening dyspnoea Decreased level of consciousness, restlessness, anxiousness, and/or irritability |
|

Musculoskeletal Assessment
Subjective Assessment
Collect subjective data from the patient and pay particular attention to what the patient is reporting about current symptoms, as well as history of musculoskeletal injuries and disease. Information during the subjective assessment should be compared to expectations for the patient’s age group or that patient’s baseline. For example, an older patient may have a chronic limited range of motion in the knee due to osteoarthritis, whereas a child may have a new, limited range of motion due to a knee sprain that occurred during a sports activity.
Objective Assessment
A routine physical exam of the musculoskeletal system by a registered nurse is to assess function and screen for abnormalities. Most information about function and mobility is gathered during the patient interview, but the nurse also observes the patient’s posture, walking, and movement of their extremities during the physical exam.
During a routine assessment of a patient during inpatient care, a registered nurse typically completes the following musculoskeletal assessments:
- Assess gait
- Inspect the spine
- Observe the range of motion of joints
- Inspect muscles and extremities for size and symmetry
- Assess muscle strength (Figures 5 and 6)
- Palpate extremities for tenderness.
While assessing an older adult, keep in mind they may have limited mobility and range of motion due to age-related degeneration of joints and muscle weakness. Be considerate of these limitations and never examine any areas to the point of pain or discomfort. Support the joints and muscles as you assess them to avoid pain or muscle spasms. Compare bilateral sides simultaneously and expect symmetry of structure and function of the corresponding body area.

Inspection
General inspection begins by observing the patient in a standing position for postural abnormalities. Observe their stance and note any abnormal curvature of the spine such as kyphosis, lordosis, or scoliosis. Ask the patient to walk away from you, turn, and walk back toward you while observing their gait and balance.
Ask the patient to sit. Inspect the size and contour of the muscles and joints and if the corresponding parts are symmetrical. Notice the skin over the joints and muscles and observe if there is tenderness, swelling, erythema, deformity, or asymmetry. Observe how the patient moves their extremities and note if there is pain with movement or any limitations in active range of motion (ROM). Active range of motion is the degree of movement the patient can voluntarily achieve in a joint without assistance.
Palpation
Palpation is typically done simultaneously during the inspection. As you observe, palpate each joint for warmth, swelling, or tenderness. If you observe a decreased active range of motion, gently attempt a passive range of motion by stabilising the joint with one hand while using the other hand to gently move the joint to its limit of movement. Passive range of motion is the degree of range of motion demonstrated in a joint when the examiner is providing the movement. You may hear crepitus as the joint moves. Crepitus sounds like a crackling, popping noise, which is considered normal if not associated with pain. As the joint moves, there should not be any reported pain or tenderness.
| Assessment | Expected Findings | Unexpected Findings (Document and notify the provider if a new finding*) |
| Inspection
|
Erect posture with good balance and normal gait while walking. Joints and muscles are symmetrical with no swelling, redness, or deformity. Active range of motion of all joints without difficulty. No spine curvature from the posterior view. | Spinal curvature is present. Poor balance or unsteady gait while walking. Swelling, bruising, erythema, or tenderness over joints or muscles. Deformity of joints. Decreased active range of motion. Contracture or foot drop present. |
| Auscultation
|
Not applicable | Crepitus associated with pain on movement. |
| Palpation
|
No palpable tenderness or warmth of joints, bones, or muscles. Muscle strength 5/5 against resistance. | Warmth or tenderness on palpation of joints, bones, or muscles. Decreased passive range of motion. Muscle strength of 3/5 or less. |
| *CRITICAL CONDITIONS to report immediately |
Hot, swollen, painful joint. Suspected fracture, dislocation, sprain, or strain. | |
Gastrointestinal and Genitourinary Assessment
The gastrointestinal (GI) system is responsible for the ingestion of food and the absorption of nutrients. Additionally, the GI and genitourinary (GU) systems are responsible for the elimination of waste products. Therefore, during the assessment of these systems, the nurse collects subjective and objective data regarding the underlying structures of the abdomen and the normal functioning of the GI and GU systems.
Subjective Assessment
A focused gastrointestinal and genitourinary subjective assessment collects data about the signs and symptoms of GI and GU diseases, including any digestive or nutritional issues, relevant medical or family history of GI and GU diseases, and any current treatment for related issues.
Gastrointestinal
Pain is the most common complaint related to abdominal problems and can be attributed to multiple underlying etiologies. Because of the potential variability of contributing factors, a careful and thorough assessment of this chief complaint should occur. Additional associated questions include asking if bloody stools (haematochezia); dark, tarry stools (melaena); bloating (abdominal distention); or vomiting of blood (hematemesis) are occurring.
Nausea, vomiting, diarrhea, and constipation are common issues experienced by hospitalised patients due to adverse effects of medications or medical procedures. It is important to ask a patient daily about the date of their last bowel movement and flatus so that a bowel management program can be initiated if necessary. If a patient is experiencing diarrhea, it is important to assess and monitor for signs of dehydration or electrolyte imbalances. Dehydration can be indicated by dry skin, dry mucous membranes, or sunken eyes. These symptoms may require reporting to medical staff for further treatment.
Additional specialised assessments of GI system function can include examination of the oropharynx and oesophagus. For example, patients who have experienced a cerebrovascular accident (CVA), also called a “stroke,” may have trouble swallowing (dysphagia). The nurse is often the first to notice these difficulties in patients who are swallowing pills, liquid, or food and can advocate for treatment to prevent complications, such as unintended weight loss or aspiration pneumonia.
Genitourinary
The nursing assessment of the genitourinary system generally focuses on bladder function. Ask about urinary symptoms, including dysuria, urinary frequency, or urinary urgency. Dysuria is any discomfort associated with urination and often signifies a urinary tract infection. Patients with dysuria commonly experience burning, stinging, or itching sensations. In elderly patients, changes in mental status may be the presenting symptom of a urinary tract infection. In women with dysuria, asking whether the discomfort is internal or external is important because vaginal inflammation can also cause dysuria as urine passes by the inflamed labia.
Abnormally frequent urination (e.g., every hour or two) is termed urinary frequency. In older adults, urinary frequency often occurs at night and is termed nocturia. The frequency of normal urination varies considerably from individual to individual depending on personality traits, bladder capacity, or drinking habits. It can also be a symptom of a urinary tract infection, pregnancy in females, or prostate enlargement in males.
Urinary urgency is an abrupt, strong, and often overwhelming need to urinate. Urgency often causes urinary incontinence, a leakage of urine. When patients experience urinary urgency, the desire to urinate may be constant with only a few millilitres of urine eliminated with each voiding.
Objective Assessment
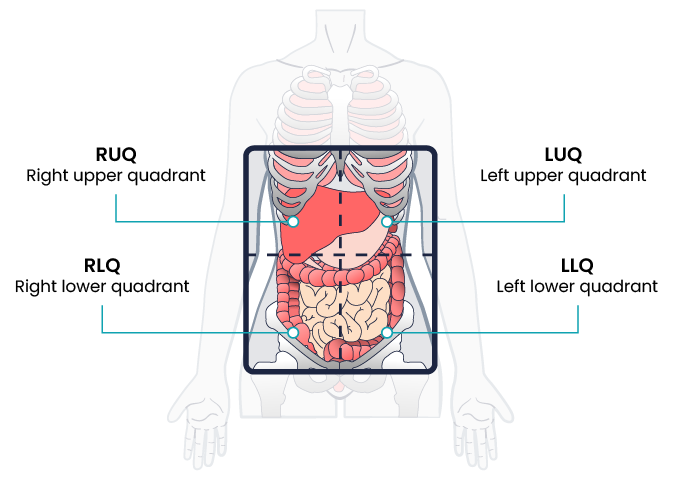
Physical examination of the abdomen includes inspection, auscultation, palpation, and percussion. Note that the order of physical assessment differs for the abdominal system compared to other systems. Palpation should occur after the auscultation of bowel sounds so that accurate, undisturbed bowel sounds can be assessed. The abdomen is roughly divided into four quadrants: right upper, right lower, left upper, and left lower. When assessing the abdomen, consider the organs located in the quadrant you are examining (Figure 7).
In preparation for the physical assessment, the nurse should create an environment in which the patient will be comfortable. Encourage the patient to empty their bladder before the assessment. Warm the room and stethoscope to decrease tensing during assessment.
Inspection
The abdomen is inspected by positioning the patient supine on an examining table or bed. The head and knees should be supported with small pillows or folded sheets for comfort and to relax the abdominal wall musculature. The patient’s arms should be at their side and not folded behind the head, as this tenses the abdominal wall. Ensure the patient is covered adequately to maintain privacy, while still exposing the abdomen as needed for a thorough assessment. Visually examine the abdomen for overall shape, masses, skin abnormalities, and any abnormal movements.
- Observe the general contour and symmetry of the entire abdominal wall. The contour of the abdomen is often described as flat, rounded, scaphoid (sunken), or protuberant (convex or bulging).
- Assess for distention. Generalised distention of the abdomen can be caused by obesity, bowel distention from gas or liquid, or fluid buildup.
- Assess for masses or bulges, which may indicate structural deformities like hernias or related to disorders in abdominal organs.
- Assess the patient’s skin for uniformity of colour, integrity, scarring, or striae. Striae are white or silvery elongated marks that occur when the skin stretches, especially during pregnancy or excessive weight gain.
- Note the shape of the umbilicus; it should be inverted and midline.
- Carefully note any scars and correlate these scars with the patient’s recollection of previous surgeries or injuries.
- Document any abnormal movement or pulsations. Visible intestinal peristalsis can be caused by intestinal obstruction. Pulsations may be seen in the epigastric area in patients who are especially thin, but otherwise should not be observed.
Auscultation
Auscultation, or the listening of the abdomen, follows inspection for a more accurate assessment of bowel sounds. Use a warmed stethoscope to assess the frequency and characteristics of the patient’s bowel sounds, which are also referred to as peristaltic murmurs.
Begin your assessment by gently placing the diaphragm of your stethoscope on the skin in the right lower quadrant (RLQ), as bowel sounds are consistently heard in that area. Bowel sounds are generally high-pitched, gurgling sounds that are heard irregularly. Move your stethoscope to the next quadrant in a clockwise motion around the abdominal wall.
It is not recommended to count abdominal sounds because the activity of normal bowel sounds may cycle with peak-to-peak periods as long as 50 to 60 minutes. Most peristaltic murmurs are produced by the stomach, with the remainder from the large intestine and a small contribution from the small intestine. Because the conduction of peristaltic murmur is heard throughout all parts of the abdomen, the source of peristaltic murmur is not always at the site where it is heard. If the conduction of peristaltic sounds is good, auscultation at a single location is considered adequate.
Hyperactive bowel sounds may indicate bowel obstruction or gastroenteritis. Sometimes you may be able to hear a patient’s bowel sounds without a stethoscope, often described as “stomach growling” or borborygmus. This is a common example of hyperactive sounds. Hypoactive bowel sounds may be present with constipation, after abdominal surgery, peritonitis, or paralytic ileus. As you auscultate the abdomen, you should not hear vascular sounds. If heard, this finding should be reported to the healthcare provider.
Palpation
Palpation, or touching, of the abdomen involves using the flat of the hand and fingers (not the fingertips) to detect palpable organs, abnormal masses, or tenderness. When palpating the abdomen of a patient reporting abdominal pain, the nurse should palpate that area last. Light palpation is primarily used by bedside nurses to assess for musculature, abnormal masses, and tenderness. Deep palpation is a technique used by advanced practice clinicians to assess for enlarged organs. Lightly palpate the abdomen by pressing into the skin about one centimetre beginning in the RLQ. Continue to move around the abdomen in a clockwise manner.
Palpate the bladder for distention. Palpate gently from the umbilicus down toward the pelvis feeling for a full bladder. The bladder is not normally palpable, but a distended bladder may reach the umbilicus. A full bladder presents as a pelvis mass, which is typically regular, smooth, firm, and oval-shaped. It arises in the midline. Note the patient’s response to palpation, such as pain, guarding, rigidity, or rebound tenderness. Voluntary guarding refers to the voluntary contraction of the abdominal wall musculature, usually due to fear, anxiety, or the touch of cold hands. Involuntary guarding is the reflexive contraction of overlying abdominal muscles as the result of peritoneal inflammation. Rigidity refers to involuntary contraction of the abdominal musculature in response to peritoneal inflammation, a reflex the patient cannot control. Rebound tenderness is another sign of peritoneal inflammation or peritonitis. To elicit rebound tenderness, the nurse maintains pressure over an area of tenderness and then withdraws the hand abruptly. If the patient winces with pain upon withdrawal of the hand, the test is positive.
Percussion
You may observe advanced practice nurses and other healthcare professionals percussing the abdomen to obtain additional data. Percussing can be used to assess the liver and spleen or to determine if costovertebral angle (CVA) tenderness is present, which is related to inflammation of the kidney.
| Assessment | Expected Findings | Unexpected Findings (Document and notify the provider of any new findings*) |
|
Inspection
|
|
|
|
Auscultation
|
|
|
|
Palpation
|
|
|
|
Genitourinary |
|
|
|
*CRITICAL CONDITIONS to report immediately |
|
|
Integumentary Assessment
A routine integumentary assessment by a registered nurse in an inpatient care setting typically includes inspecting overall skin colour; inspecting for skin lesions and wounds; and palpating extremities for oedema, temperature, and capillary refill.
Subjective Assessment
Begin the assessment by asking focused interview questions regarding the integumentary system.
Objective Assessment
There are five key areas to note during a focused integumentary assessment: colour, skin temperature, moisture level, skin turgor, and any lesions or skin breakdown. Certain body areas require observation because they are more prone to pressure injuries in locations such as bony prominences, skin folds, perineum, between digits of the hands and feet, and under any medical device that can be removed during routine daily care. The following inspection procedures should be considered:
| Assessment | Expected Findings | Unexpected Findings (Document and notify the provider if a new finding*) |
|
Inspection
|
Skin is the expected colour for ethnicity without lesions or rashes. |
|
|
Palpation
|
Skin is warm and dry with no oedema. Capillary refill is less than 3 seconds. Skin has normal turgor with no tenting. |
|
|
*CRITICAL CONDITIONS to report immediately
|
|
|
Key Takeaways
In this chapter, we covered:
- A “head-to-toe approach” refers to a comprehensive assessment that systematically examines a patient’s entire body, from the top of their head to the tips of their toes, to thoroughly assess their overall health status and identify any potential issues.
- Conducting a systems-based assessment using a head-to-toe approach helps in developing a nursing care plan to meet individual patient needs
- This comprehensive assessment includes neurological, cardiovascular, respiratory, musculoskeletal, gastrointestinal, genitourinary and integumental system assessments.
- Neurological assessment involves a focused history, assessing level of consciousness using tools such as the Glasgow Coma Scale, motor strength and pupillary size and response to light.
- Cardiovascular assessment involves a focused history, interpretation of vital signs such as HR and BP, auscultation of heart sounds, palpation of rate, rhythm and quality of arterial pulses, peripheral oedema and capillary refill.
- Respiratory assessment involves a focused history, interpretation of vital signs such as RR and O2 sats, inspection of the patient’s breathing pattern, skin colour, and respiratory status, palpation to identify abnormalities, auscultation of lung sounds and percussion of underlying lung tissue.
- Musculoskeletal assessment involves focused history, inspection of posture, gait and range of motion of extremities and palpation of warmth, swelling and tenderness of joints.
- Gastrointestinal assessment involves focused history such as bowel function, abdominal pain, nausea, vomiting, diarrhoea, constipation and nutrition, inspection of the contour of the abdomen, auscultation of the four quadrants of the abdomen for bowel sounds, careful palpation of the abdomen and percussion of the abdomen.
- Genitourinary assessment involves focused history such as urinary function, pelvic pain. Objective assessment is performed during the gastrointestinal assessment during palpation of the abdomen including palpation of the bladder and pelvic area.
- Integumentary assessment involves focused history and assessment of skin colour, temperature, moisture level, skin turgor, and any lesions or skin breakdown.
Chapter Attribution
Introduction to health assessment for the nursing professional (2024) edited by Dr. Jennifer L. Lapum and Michelle Hughes, Toronto Metropolitan University, is used under a CC BY-NC licence.
Nursing skills 2e (2023) by Open Resources for Nursing, Chippewa Valley Technical College, is used under a CC BY licence.
Media Attributions
- Glascow Coma Scale © OpenStax adapted by Eileen Siddins is licensed under a CC BY-NC (Attribution NonCommercial) license
- Oedema Measurement © OpenStax adapted by Eileen Siddins is licensed under a CC BY (Attribution) license
- Heart Valve Landmarks © Eileen Siddins is licensed under a CC BY-NC (Attribution NonCommercial) license
- Chest Wall Auscultation Landmarks © OpenStax is licensed under a CC BY (Attribution) license
- Strength Tests © Ben Green is licensed under a CC BY-NC (Attribution NonCommercial) license
- Strength and Motion Tests © Ben Green is licensed under a CC BY-NC (Attribution NonCommercial) license
- Abdomen Quadrants © Eileen Siddins is licensed under a CC BY (Attribution) license
