Health Assessment, Part Two: Physical Health Assessment – Examination Techniques, Primary and General Survey, and Vital Signs
Amy McCrystal and Jessica Best
Learning Outcomes
In this chapter you will learn how to:
- Describe the four objective assessment techniques (inspection, palpation, percussion, and auscultation) and demonstrate their accurate application in practice
- Implement the primary survey approach (ABCDE) as the foundation for systematic patient health assessment
- Accurately measure vital signs, including respirations, oxygen saturation, blood pressure, pulse, and temperature, and interpret findings within normal parameters.
Physical Examination Techniques
Before moving on to physical health assessment, it is vital to understand the four objective assessment techniques: Inspection, palpation, percussion, and auscultation (IPPA). These involve your senses of sight, hearing, and touch. You should also be aware of your sense of smell when conducting any physical assessment, as certain odours can act as a cue; for example, a foul odour may indicate an infection.
- Inspection involves your visual sense to observe the patient.
- Palpation involves your sense of touch to physically feel areas of the body.
- Percussion involves a combination of touch and hearing, but your focus is on hearing sounds when tapping the areas of the body.
- Auscultation involves your sense of hearing while listening to areas of the body with a stethoscope.
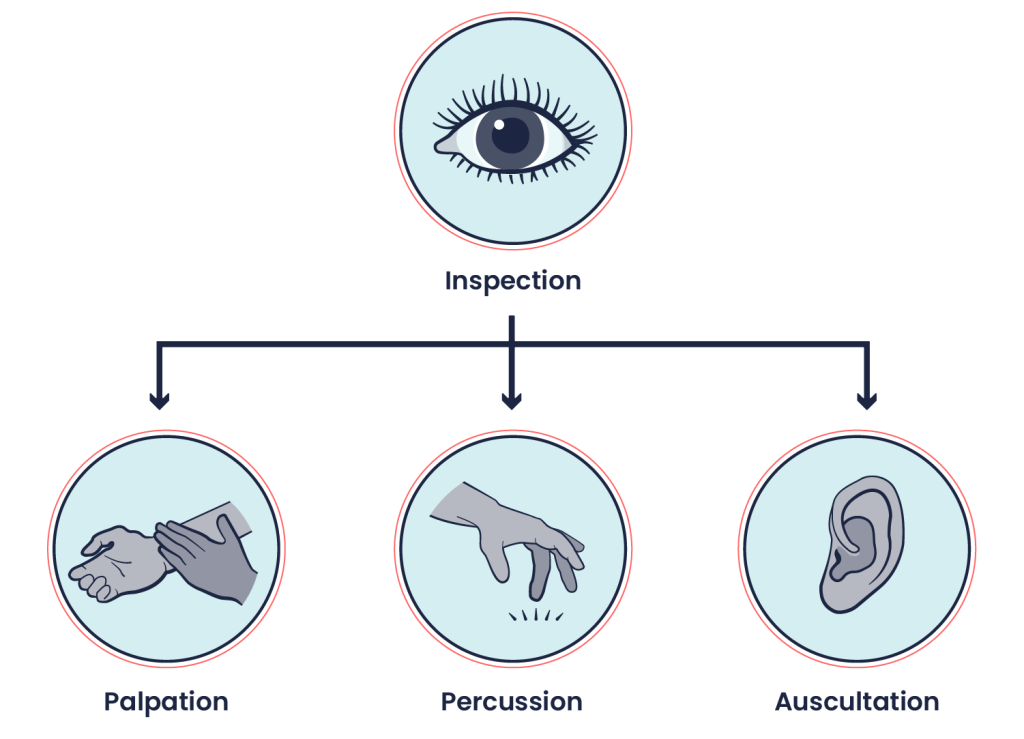
These techniques should be performed with methodical and deliberate action. Always perform inspection first because it is the least invasive and does not involve physical touch. Inspection also allows you to establish a baseline for your assessment. For example, if you observe someone crouched over in pain, this will inform the sequence of your subsequent assessment techniques. Typically, palpation, percussion, and then auscultation follow inspection. The sequencing of techniques may be rearranged for several reasons, including which system is being assessed and for safety reasons. For example, when assessing the abdomen, auscultation is generally performed before percussion and palpation. Patient safety and comfort also influence the sequence of objective techniques. For example, with a sleeping infant, you should perform inspection and auscultation while the child is calm and to avoid awakening the patient. You will learn more about modifications to the sequencing of techniques as you learn about specific body systems. Determining technique sequence also comes with experience.
When applicable, these IPPA techniques are used to assess body systems (e.g., eyes, ears, heart and neck vessels, lungs and thorax, abdomen, and musculoskeletal). However, not all techniques are applicable to all systems. For example, you would not auscultate an eye because it does not emit a sound that would give you relevant data.
Inspection
Inspection is the technique of purposeful and systematic observation of the patient—note that this does not involve touching, but only careful visual observation. It begins as soon as the patient walks in the room, or you enter the patient’s room, and it ends when you or the patient leaves the room. You should maintain inspection constantly throughout the examination.
While inspecting, you should note both normal and abnormal findings. When doing so, you should complete a bilateral comparison in which you compare the left side of the body to the right side for comparison. For example, if you notice that the upper left eyelid is drooping, is this the same for the upper right eyelid? This comparison is helpful because symmetry is usually expected, whereas asymmetry should draw your attention as a potential cue for an abnormal finding.
The systematic process involves inspecting the patient overall to gain a general impression, and then inspecting specific body areas and body systems to focus your assessment. For example, when inspecting the patient overall, you may assess the following:
Inspect specific body areas as you assess each body system. For example, you will inspect the chest area when you assess the cardiac system (i.e., the heart). Doing so in a systematic manner will allow you to only expose the area that you are assessing while ensuring appropriate draping.
Palpation
Palpation is the technique of using your hands/fingers to assess the patient based on your sensation of touch. It provides the opportunity to use your sense of touch to assess the body and further examine cues that were identified during inspection.
As you prepare to touch the patient, it is important that you:
- Ask permission to touch. Touch can sometimes be misinterpreted, so it is essential to be purposeful with each movement and explain what you are doing.
- Consider the warmth of your hands. Cold hands can be uncomfortable for the patient. Do not blow on your hands to warm them up as this will transfer bacteria from your mouth to your hands. Instead, rub your hands together to create heat.
- Avoid staccato touch unless indicated. The jerk-like movement can be difficult to anticipate for the patient. When touching the patient, use firm pressure unless otherwise indicated. Light pressure can be ticklish. In this case, consider sometimes incorporating the patient’s hands, where possible, into your palpation technique to reduce tickling.
Palpation provides useful information to assess and evaluate findings related to temperature, texture, moisture, thickness, swelling, elasticity, contour, lumps/masses/deformities, consistency/density, organ location and size, vibration, crepitation, and presence of pain. See below for specifics of how to conduct palpation based on what you are attempting to assess.
 |
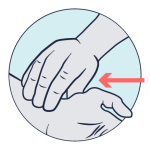
The dorsal aspect of your hand has thin skin relative to the rest of your hand and is therefore more sensitive to temperature. Temperature refers to the degree of heat or cold an object holds. Use the dorsal surface of your own hands (i.e., the back of the hands), to assess the temperature of a surface (e.g., skin). For example, findings may include “warm skin temperature on arms, equal bilaterally.” |
|
|
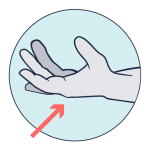
Your fingertips are densely innervated and therefore sensitive to tactile discrimination. Recall your thumb has a pulse and therefore is not ideal for assessing pulsatility (e.g., pulses) of the patient. Considerations when using fingertips to inspect are presented below.
|
|
|
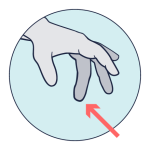
Cupping of the hand or grasping with fingers and thumbs will allow you to gain coverage of an anatomical area while feeling for abnormalities. Bones and muscles (and associated deformities) as well as the trachea and testicles are often assessed using a gentle grasping motion of the fingers and thumbs. Another type of crepitation is an abnormal grating or crunching sound or sensation felt and heard over joints at the location where bones meet. It occurs when the articular surface of bones grinds together. This is different to the sounds made when a person cracks their fingers or joints (which are caused by the slipping of tendons/ligaments over bony surfaces). Listen and place your hand on (i.e., cup your hand over) the joint, or grasp the joint with your fingers and thumb, while asking the patient to move their joints through a range of motion. This will be discussed in more detail when you learn about the musculoskeletal system. |
|
|
The metacarpophalangeal joints (base of fingers on the palmar surface) or ulnar surface of hands/fingers (are the most sensitive to movement discrimination (vibration and pulsatility). Vibration is a subtle oscillating movement that resembles a quivering or shaking motion. It may be comparable to the sensation of an off-balanced washing machine, standing on a platform when the train is entering, or the sensation of a mild earthquake. Vibrations may be felt over the lungs, termed tactile fremitus; this will be discussed in more detail when you learn about the respiratory system. Pulsatility, also referred to as abnormal pulsations felt over the heart, can be assessed with the ulnar surface of your hands or the palmar surface of your metacarpophalangeal joints. These abnormal pulsations are referred to as “thrills” and will be discussed in more detail when you learn about the cardiovascular system. For example, findings may include “a thrill was palpated over second intercostal space left sternal border.”
|
Percussion
Percussion involves tapping the body to elicit sounds and determining whether the sounds are appropriate for a particular organ or area of the body. Try tapping different surfaces with your fingertips and compare the sounds: a firm hard surface like a wood desk or table, a thick textbook, a window, or even a drum. As you tap these surfaces, you can hear that each surface elicits a different sound based on the object’s consistency. This concept also applies to the body.
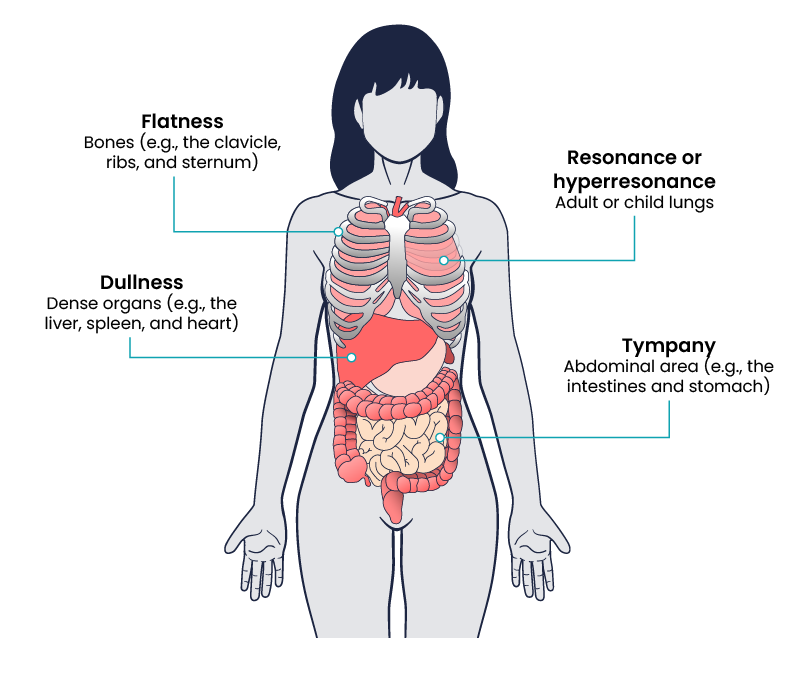
Each body part that you percuss provides information about the consistency as well as the size and borders of the underlying structure. For example, the percussion sounds can tell you if the organ is:
- Air filled (e.g., lungs)
- Fluid filled (e.g., bladder and stomach)
- Dense (e.g., liver).
Percussion can also help reveal the presence of masses, particularly if they are close to the surface of the body.
There are three approaches to percussion, but the most widely used is indirect percussion (Figure 2), which is the application of a mediated force using parts of both hands.
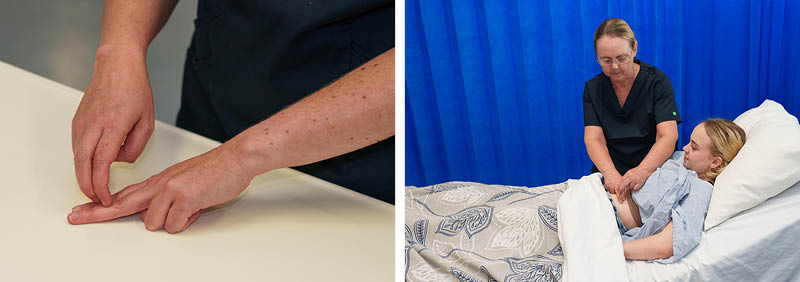
Indirect percussion is often used to assess the lungs and the abdomen (e.g., bowels, bladder, liver). The steps of this technique are as follows:
- Non-dominant hand: with your hand parallel to the body, place the distal interphalangeal joint of the pleximeter (middle) finger of your non-dominant hand firmly on the body region to percuss. Ensure that only your interphalangeal joint is touching the body (and not the rest of the hand) and that the finger is fully extended.
- Dominant hand: flex (bend) the pleximeter finger of your dominant hand and with the tip of your finger, tap twice on the distal interphalangeal joint of your non-dominant hand. The pleximeter finger of your dominant hand should be at a 90-degree angle to the surface of the body. The motion should be firm and quick with a very short duration. To optimise this motion, the wrist of your dominant hand should be relaxed and loose with your forearm parallel to the person’s body. This skill requires lots of practice, so start by practising the technique on a table or your own leg.
As a nurse, you need to become familiar with the expected percussion sounds so that you can identify what is normal and what is abnormal. See Figure 3 for the expected location of percussion sounds and the tabs below for an explanation of the types of percussion sounds heard including resonance, hyperresonance, tympany, dullness, and flatness.
Another form of indirect percussion is used to assess the kidneys; this technique will be discussed in more detail when you learn about abdominal assessment.
Direct percussion involves an unmediated approach with the use of only one of your hands; it is used to assess pain/tenderness associated with the sinuses or asses a newborn/infant’s lungs. The steps of this technique involve flexing the index and pleximeter fingers of your dominant hand, and directly tapping the body’s surface with the tips of these fingers at a 90-degree angle.
A third approach, tool-facilitated percussion, involves using an instrument to tap the body (e.g., a reflex hammer); this technique will be discussed in more detail when you learn about neurological assessment.
Auscultation
The assessment technique of auscultation involves listening to the body. Although this is typically performed with a stethoscope, you can sometimes hear sounds from the body using just your ear. For example, you have probably heard your own or another person’s stomach growling; another example is heavy breathing after exercise.
You can perform auscultation on the body to hear several sounds including:
- High-pitched sounds like lung sounds, bowel sounds, and some heart sounds
- Low-pitched sounds like some heart sounds, as well as sounds associated with abnormal vascular sounds of the carotid arteries and the aorta.
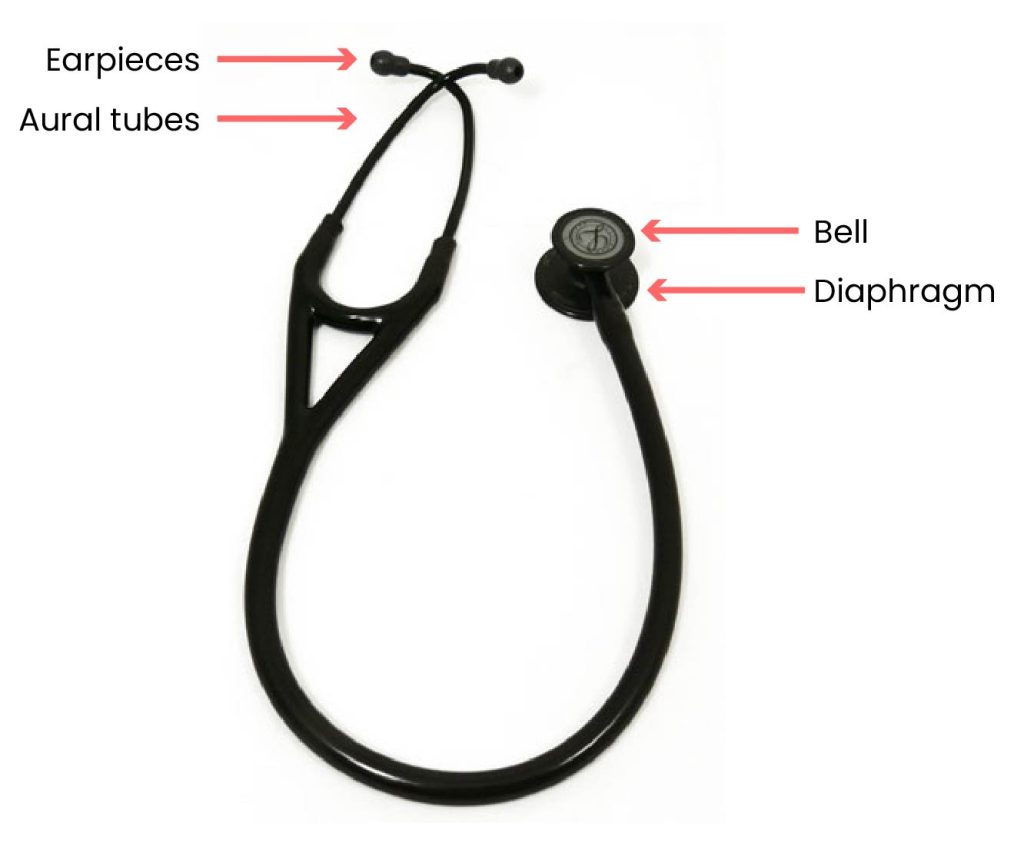
To perform auscultation, you need a high-quality stethoscope with a separate diaphragm on one side and a bell on the other side. The diaphragm is used for auscultating high-pitched sounds, while the bell is used for auscultating low-pitched sounds. Another option is an acoustic stethoscope in which the diaphragm and bell are manufactured as one piece: using this type of stethoscope, you can alternate pressure to auscultate for high- or low-pitched sounds, using light pressure to accentuate low-pitched sounds and firmer pressure to accentuate high-pitched sounds. There are also electronic stethoscopes to help amplify sounds for people with hearing loss.
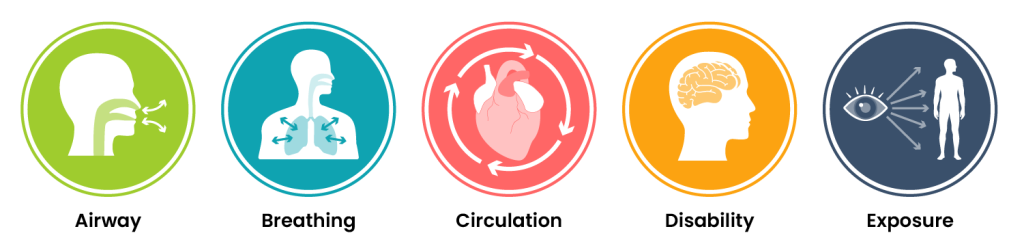
Primary Survey
The primary survey, often referred to as the ABCDE approach (Airway, Breathing, Circulation, Disability, and Exposure), forms the crucial first step in the assessment process. Nurses should perform an ABCDE assessment on patients during every encounter, not only at the first presentation but also during every subsequent contact. This quick primary survey ensures the patient is medically stable. If any signs indicate patient distress, appropriate escalation and emergency care are initiated. The ABCDE components are initially assessed, and emergency actions are taken as needed. Mental status, behaviour, mobility and communication can be assessed after the initial survey.
General Survey
General Appearance
After ensuring your patient is medically stable by completing a primary survey, a general survey consists of using your senses to observe a patient’s general appearance, behaviour, mobility, and communication. Items to consider when assessing general appearance include the following:
- Signs of pain or distress: Patients may exhibit signs of pain or distress that should be reported such as grimacing, moaning, or increased anxiety. Set the priorities for your focused assessments based on any signs of distress demonstrated by your patient.
- Age: Observe if the patient appears to be their stated age. Chronic disease can cause a patient to appear older than their age. Factors can occur with older adults that may influence how well the patient can participate in the assessment, such as hearing, vision, or mobility impairments.
- Body type: No patient is the same which can be due to genetics (eg/height) or lifestyle factors.
- Hygiene, grooming, and dress: Observe the overall cleanliness of the patient’s hair, face, and nails and note any odours. Odours can indicate poor hygiene or various disease states. Validate odours by performing additional focused assessments as needed. Note the appearance of the patient’s clothing; is it clean and appropriate for the season? If not, findings can reflect on a patient’s cognitive abilities, emotional state, and ability to complete daily activities.
Mental Status
When assessing a patient’s overall mental status, it is important to compare findings to their known baseline if this information is known or available. Are they orientated to person, place, and time, meaning can they tell you their name, location, and the day of the week? If you are concerned about a sudden change in a patient’s mental status, obtain emergency assistance according to your organisational policy.
Behaviour
While observing the patient, note their behaviours during your interaction. Consider the following items:
Mobility
Observe your patient’s body movements, noting posture, gait, and range of motion:
 |
Posture: Patients with normal sitting and standing posture are upright and have a parallel alignment from the shoulders to the hips. Note if the patient is hunched, slumped, contracted, or rigid.
|
 |
Gait and balance: Observe how the patient walks or stands. Are the movements organised, coordinated, or uncoordinated? Are they able to maintain balance while standing without leaning on or touching anything? Healthy people walk with a smooth gait and arms moving freely at their sides and can stand unassisted. A change in gait or balance often signifies underlying health conditions and increases the risk of falling.
|
 |
Range of motion and mobility: Observe the patient moving their extremities. Do extremities on the right and left sides move equally? Note any tremors or movements that are not purposeful. Are the patient’s abilities appropriate for their age? Is the patient moving normally or do they have specific limitations? Does the patient use any assistive devices such as a cane or walker? Mobility is a key component in being able to care for oneself independently, so note any potential concerns for adults that may impact their ability to complete activities of daily living.
|
Communication
- Speech: Observe how your patient is speaking during your interaction. Are they speaking in an understandable tone and even pace, or is it garbled or difficult to understand? Neurological disorders can cause speech to be slow, slurred, and hard to understand. Is there an emotional component to their words? Is there a language barrier requiring an interpreter?
- Response to commands: Does the patient follow instructions you are providing during your assessment, or do they have difficulty understanding or cooperating?
Lifespan Considerations During a General Appearance Assessment
 |
Children: When performing a general survey on a child, be aware of their developmental stages to establish expectations for normal findings. Use a calm and gentle tone to establish trust. Demonstrations using dolls or stuffed animals before performing procedures are often helpful. Be aware that the parents of toddlers and school-aged children will provide most of the information during an assessment.
|
 |
Adolescents: Adolescents may refrain from sharing essential information related to their care in front of their parents, especially regarding high-risk behaviours such as smoking, alcohol or drug use, sexual activity, or suicidal thoughts. It is often helpful to allow time to interview the adolescent privately, in addition to gathering information when the parent is present.
|
 |
Older Adults: Recognise normal changes associated with ageing when performing a general survey. If your patient wears glasses or hearing aids, be sure they are in place before asking questions. You may need to allow extra time for your assessment, depending on the abilities of your patient. If an older adult cannot communicate effectively, nurses may also consult sources such as family members and electronic medical records for more information.
|
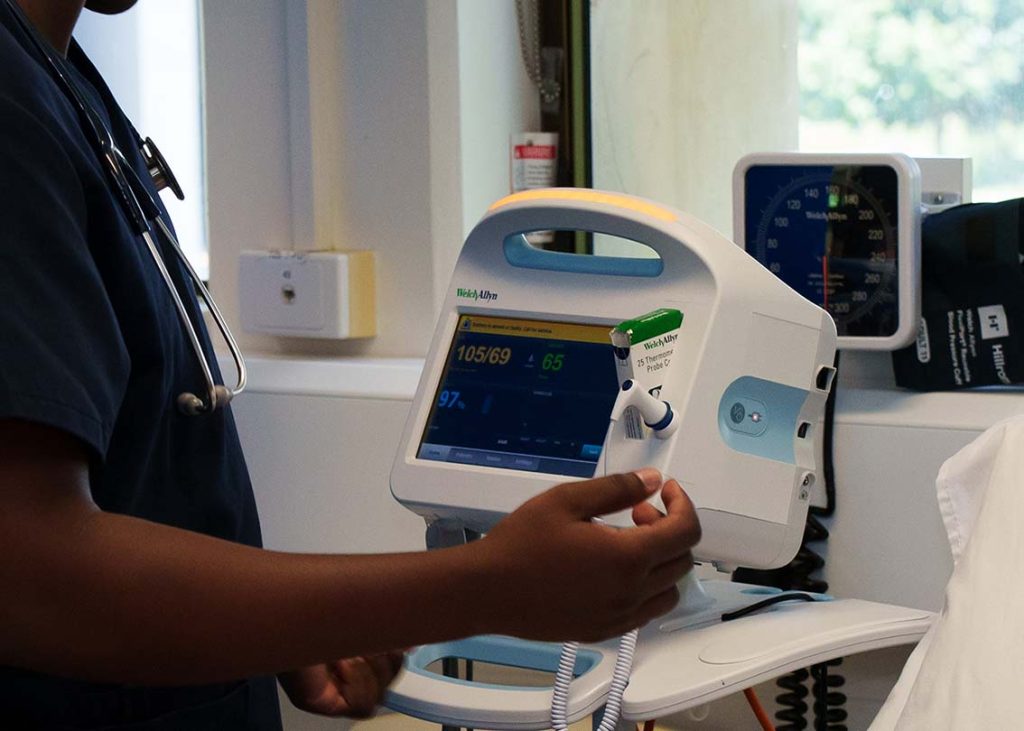
Vital Signs
Vital signs are typically obtained prior to performing a physical assessment. Vital signs include temperature, pulse, respiratory rate, blood pressure, and oxygen saturation (Figure 6). A pain assessment can be conducted when taking a patient’s vital signs. This is covered further in the Pain Assessment chapter.
Respiration
Respiration refers to a person’s breathing and the movement of air into and out of the lungs. The respiratory system provides oxygen to body tissues for cellular respiration, removes the waste product carbon dioxide, and helps maintain acid–base balance. Inspiration is the process that causes air to enter the lungs, and expiration is the process that causes air to leave the lungs. A respiratory cycle (or one breath while you are measuring respiratory rate) is one sequence of inspiration and expiration.
Respiration is assessed for quality, rhythm, and rate. The quality of a person’s breathing is normally relaxed and silent. Nurses assess the use of accessory muscles in the neck and chest and indrawing of intercostal spaces (also referred to as intercostal tugging), which can indicate respiratory distress. Respiratory distress can also cause nasal flaring, and the person often moves into a tripod position. The tripod position involves leaning forward and placing arms/hands and/or upper body on one’s knees or on the bedside table. Respiration normally has a regular rhythm. A regular rhythm means that the frequency of the respiration follows an even tempo with equal intervals between each respiration. If you compare this to music, it involves a constant beat that does not speed up or slow down but stays at the same tempo.
Ranges
Estimated respiratory rates vary based on the source. It is important to consider the patient and the situation to determine whether the respiratory rate is normal. Always check with the institution where you work about their normal respiratory rate ranges. Nurses consider the patient’s health and illness state and determinants such as rest/sleep, awake/active, pain, and crying when assessing the respiratory rate. The following respiratory rate ranges (breaths per minute) are listed according to age below:
Technique
The respiratory rate is counted after taking the pulse rate so that the patient is not aware that you are taking it. Once you have finished counting the pulse, leave your fingers in place and then begin assessing respiration. It is best to assess the patient in an upright position (sitting or high Fowlers) so that the lungs can fully inflate. Observe the chest or abdomen rise and fall. One respiration includes a full respiratory cycle (including both inspiration and expiration). Thus, the rise and the fall of the abdomen or chest is counted as one full breath. Count for 30 seconds if the rhythm is regular or for a full minute if irregular. Report the respiration as breaths per minute, as well as whether breathing is relaxed, silent, and has a regular rhythm. Report whether chest movement is symmetrical.
What Should the Nurse Consider?
Assess the movement of the chest with adults and the abdomen with newborns and infants. Adults are normally thoracic breathers (the chest moves) while infants are normally diaphragmatic breathers (the abdomen moves). Some adults are abdominal breathers. Breathing rates are counted for one minute with infants because the respiratory rhythm (tempo) can vary significantly. For example, the breathing rates of infants can speed up and slow down with some short periods of apnea (pauses in breathing).
When assessing respiration, ensure that thick and bulky clothing is removed so you can clearly see the rise and fall of the chest or abdomen. Although respiratory rates are best counted at rest, sometimes this is not possible (e.g., in an emergency and with a child who is crying). In this case, document the situation. While assessing respirations, it is important to note signs of respiratory distress, which can include loud breathing, nasal flaring, and intercostal retractions.
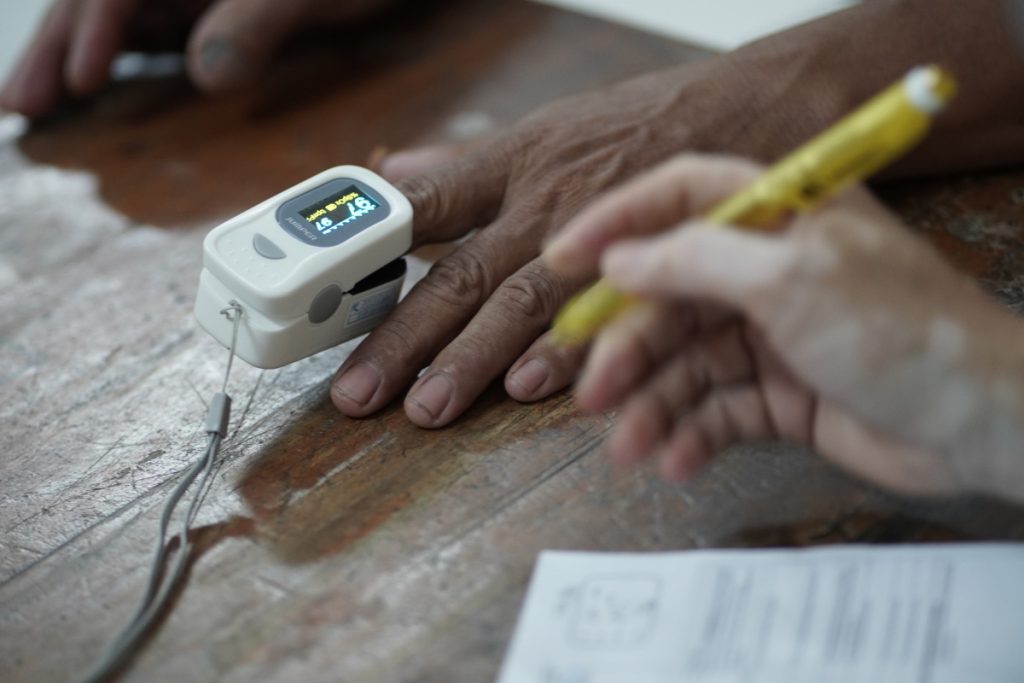
Oxygen Saturations
Oxygen saturation refers to the percentage of haemoglobin molecules saturated with oxygen. Haemoglobin molecules can each carry four oxygen molecules; the oxygen binds or attaches to haemoglobin molecules. Oxygen saturation provides information about how much haemoglobin is carrying oxygen, compared to how much haemoglobin is not carrying oxygen. Healthcare providers measure oxygen saturation because it provides information about a patient’s state of health. The body’s tissues and organs require oxygen for metabolism, and oxygen saturation can reveal whether there is sufficient oxygen in the blood or whether the patient is in a state called hypoxaemia (insufficient oxygen in the blood).
Oxygen saturation levels can influence clinical decisions about whether the patient is receiving sufficient oxygen and/or requires supplemental oxygen. Oxygen saturation levels are also monitored during and after surgeries and treatments, and to assess a patient’s capacity for increased activity.
How is Oxygen Saturation Measured?
Oxygen saturation can be measured using a pulse oximetry device (Figure 7). It is a non-invasive method that gives an instant estimate of arterial oxygen saturation levels. In critically ill patients, a more accurate, but invasive approach is drawing arterial blood or using a continuous monitoring system to measure arterial blood gases through an arterial line. An arterial line is a catheter that is inserted into an artery, usually the radial artery. It provides a way to access blood gases including arterial oxygen saturation (SaO2). Here, we focus on pulse oximetry because it is identified as a vital sign.
A pulse oximetry device includes a sensor that measures light absorption of haemoglobin and represents arterial SpO2. An earlobe clip is another useful device for patients who cannot tolerate the finger or toe clip or have a condition that could affect the results, such as vasoconstriction and poor peripheral perfusion.
Ranges
Normal oxygen saturation ranges from 97–100% in a healthy individual. However, there are reasons why a lower range occurs and, in some cases, why it is sometimes acceptable. Older adults typically have lower oxygen saturation levels than younger adults. For example, someone older than 70 years of age may have an oxygen saturation level of about 95%, which is an acceptable level. It is important to note that the oxygen saturation level varies considerably based on a person’s state of health. Thus, it is important to understand both baseline readings and underlying physiology associated with certain conditions to interpret oxygen saturation levels and changes in these levels.
- People who are obese and/or have conditions such as lung and cardiovascular diseases, emphysema, chronic obstructive pulmonary disease, congenital heart disease, and sleep apnea tend to have lower oxygen saturation levels.
- Smoking can influence the accuracy of pulse oximetry in which the SpO2 is low or falsely high depending on whether hypercapnia is present. With hypercapnia, it is difficult for the pulse oximeter to differentiate oxygen in the blood from carbon monoxide (caused by smoking).
- Oxygen saturation levels may decrease slightly when a person is talking.
- Oxygen saturation may remain normal (e.g., 97% and higher) for people with anemia. However, this may not indicate adequate oxygenation because there is less hemoglobin to carry an adequate supply of oxygen for people who have anemia. The inadequate supply of oxygen may be more prominent during activity for people with anemia.
- Falsely low oxygen saturation levels may be associated with hypothermia, decreased peripheral perfusion, and cold extremities. In these cases, an ear lobe pulse oximeter device or arterial blood gases would provide a more accurate oxygen saturation level. However, arterial blood gases are usually only taken in critical care or emergency settings.
Blood Pressure
A blood pressure reading is the measurement of the force of blood against the walls of the arteries as the heart pumps blood through the body. It is reported in millimetres of mercury (mmHg). This pressure changes in the arteries when the heart is contracting compared to when it is resting and filling with blood. Blood pressure is typically expressed as the reflection of two numbers, systolic pressure and diastolic pressure. The systolic blood pressure is the maximum pressure on the arteries during systole, the phase of the heartbeat when the ventricles contract. This is the top number of a blood pressure reading. Systole causes the ejection of blood out of the ventricles and into the aorta and pulmonary arteries. The diastolic blood pressure is the resting pressure on the arteries during diastole, the phase between each contraction of the heart when the ventricles are filling with blood. This is the bottom number of the blood pressure reading. Therefore, 120/80 indicates the systolic blood pressure is 120 mmHg, and the diastolic blood pressure is 80 mmHg.
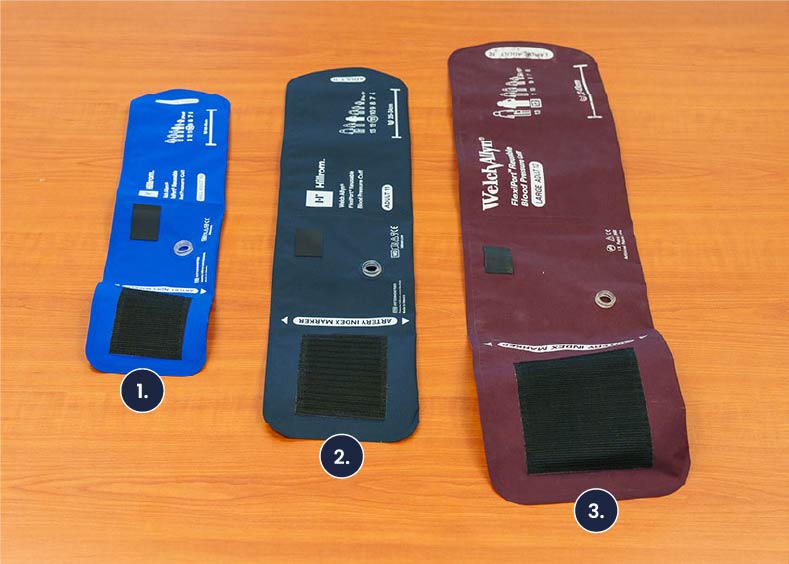
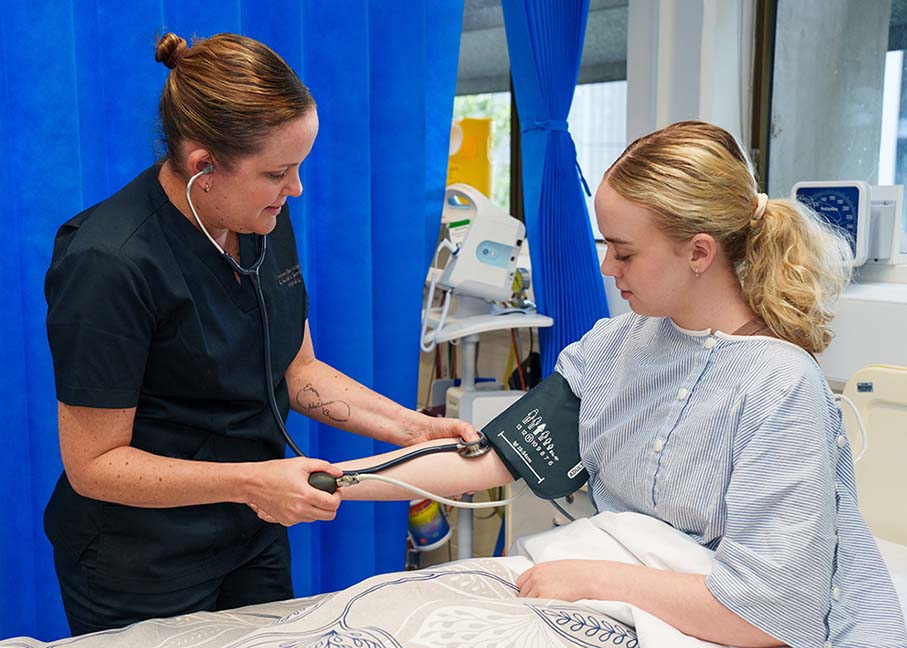
Blood pressure measurements are obtained using a stethoscope and a sphygmomanometer (Figures 8 and 9) also called a blood pressure cuff. The first appearance of sounds, called Korotkoff sounds, are noted as the systolic blood pressure reading. Korotkoff sounds are named after Dr. Korotkoff, who first discovered the audible sounds of blood pressure when the arm is constricted. The blood pressure cuff continues to be deflated until Korotkoff sounds disappear. The last Korotkoff sounds reflect the diastolic blood pressure reading. Blood pressure readings are documented as systolic blood pressure/diastolic pressure, for example, 120/80 mmHg.
Why is Blood Pressure Measured?
- A person’s blood pressure provides insight into the functioning of the body.
- The findings can provide information about the integrity of arteries and heart functioning, which can lead the healthcare provider to conduct additional assessments.
- High blood pressure can cause the arteries to become weak and damaged and cause the heart to become weak and enlarged.
- Low blood pressure can decrease the perfusion of nutrients and oxygen to the body’s cells, influencing the ability to function and potentially cellular death.
- Chronic high blood pressure can contribute to conditions such as vascular disease, myocardial infarction, cerebral stroke, kidney disease, and dementia.
Abnormal blood pressure readings can signify an area of concern and a need for intervention. Normal adult blood pressure is less than 120/80 mmHg. Hypertension is the medical term for elevated blood pressure readings of 130/80 mmHg or higher. Before diagnosing a person with hypertension, the nurses will calculate an average blood pressure based on two or more blood pressure readings obtained on two or more occasions. Some causes of hypertension can include (but are not limited to): Age (risk increases with age), race, overweight/obesity, certain health conditions such as diabetes, chronic kidney disease, pregnancy, unhealthy eating patterns, low potassium levels, or family history.
Hypotension is the medical term for low blood pressure readings between 85-110 systolic (depending on usual blood pressure) or lower. Hypotension can be caused by dehydration, bleeding, cardiac conditions, and the side effects of many medications. Hypotension can be of significant concern because of the potential lack of perfusion to critical organs when blood pressure is low. Orthostatic hypotension is a drop in blood pressure that occurs when moving from a lying down (supine) or seated position to a standing (upright) position. When measuring blood pressure, orthostatic hypotension is defined as a decrease in blood pressure by at least 20 mmHg systolic or 10 mmHg diastolic within three minutes of standing. When a person stands, gravity moves blood from the upper body to the lower limbs. As a result, there is a temporary reduction in the amount of blood in the upper body for the heart to pump, which decreases blood pressure. Normally, the body quickly counteracts the force of gravity and maintains stable blood pressure and blood flow. In most people, this transient drop in blood pressure goes unnoticed. However, some patients with orthostatic hypotension can experience light-headedness, dizziness, or fainting. This is a significant safety concern because of the increased risk of falls and injury, particularly in older adults. Orthostatic hypotension is also called postural hypotension. When obtaining orthostatic vital signs, the pulse rate may also be collected.
Method
The accurate measurement of blood pressure is important for ensuring patient safety and optimising body system function. It is crucial to follow the proper steps to obtain a patient’s blood pressure to ensure the care team has accurate data to help make healthcare decisions and determine a plan of care.
Before taking a person’s blood pressure, it is important to determine if they have a history of elevated blood pressure or if they are taking any blood pressure medication. It is helpful to establish a baseline by asking about their usual blood pressure reading or reviewing previous records in their chart. It is also important to determine if there are any arm restrictions such as those due to a fistula, mastectomy, stroke, or IV line before measuring blood pressure.
| Steps for taking accurate blood pressure |
1. Gather supplies: blood pressure cuff and stethoscope. (Select an appropriately sized cuff for the patient.)
2. Perform safety steps:
3. Cleanse the stethoscope and blood pressure cuff prior to placing it on the patient’s skin. 4. Place the patient in a relaxed reclining or sitting position. The patient should be seated quietly for at least five minutes in a chair prior to blood pressure measurement. Ask the patient which arm they prefer to use. Be aware of conditions that contraindicate the use of an arm for blood pressure measurement, such as a previous mastectomy or the presence of a fistula. During the procedure, both feet should be on the floor and the arm should be supported at heart level.
5. Remove or rearrange clothing so the cuff and the stethoscope are on bare skin. 6. Centre the bladder of the blood pressure cuff over the brachial artery with the lower margin above the antecubital space. Fit the cuff evenly and snugly. Palpate the brachial artery in the antecubital space. 7. Locate the radial pulse. 8. Inflate the cuff rapidly (while palpating the radial or brachial pulse) to the level at which pulsations are no longer felt and inflate the cuff 30 mmHg above the palpated pressure or the patient’s usual blood pressure. Note the level and rapidly deflate the cuff; wait 30 seconds. 9. With the ear tips of the stethoscope placed downward and forward, place the bell/diaphragm lightly on the brachial artery and rapidly inflate the cuff to 30 points above where the brachial or radial pulse is no longer felt. (Figure 9) 10. Deflate the cuff gradually at a constant rate by opening the valve on the bulb (2–3 mmHg/second) until the first Korotkoff sound is heard. Note the systolic pressure. 11. Continue to deflate the cuff slowly at 2 mmHg/second. Note the point at which Korotkoff sounds disappear completely as the diastolic pressure. 12. Deflate the cuff completely and remove the cuff from the patient’s arm. 13. Inform the patient of the blood pressure reading. 14. Cleanse the stethoscope and blood pressure cuff. 15. Perform proper hand hygiene. 16. Ensure safety measures when leaving the room:
17. Document findings and report significant deviations from norms according to agency policy. |
Pulse
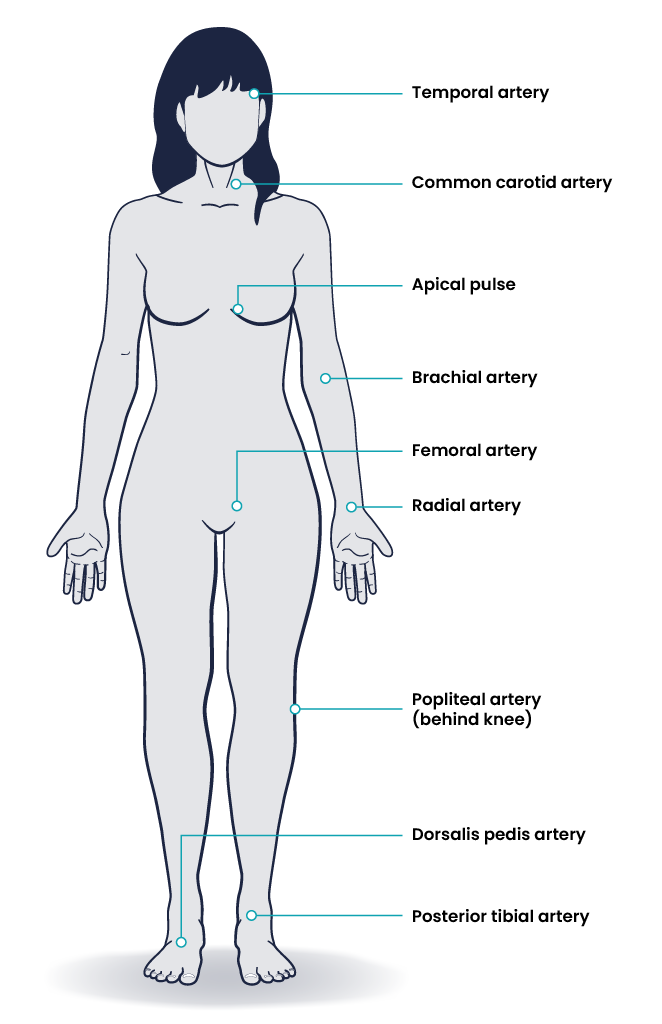
Pulse refers to a pressure wave that expands and recoils the artery when the heart contracts/beats. It is palpated at many points throughout the body. The most common locations to accurately assess pulse as part of vital sign measurement include radial, brachial, carotid, and apical pulse. The techniques vary according to the location (Figure 10).
The heart pumps a volume of blood per contraction into the aorta. This volume is referred to as stroke volume. Age is one factor that influences stroke volume, which ranges from 5–80 mL from newborns to older adults.
Pulse is measured in beats per minute, and the normal adult pulse rate (heart rate) at rest is 60–100 beats per minute. Newborn resting heart rates range from 100–175 bpm. Heart rate gradually decreases until young adulthood and then gradually increases again with age. A pregnant woman’s heart rate is slightly higher than her pre-pregnant value (about 15 beats). The following heart rate ranges (beats per minute) are listed according to age below:
The pulse rhythm, rate, force, and equality are assessed when palpating pulses. The normal pulse rhythm is regular, meaning that the frequency of the pulsation felt by your fingers follows an even tempo with equal intervals between pulsations. If you compare this to music, it involves a constant beat that does not speed up or slow down but stays at the same tempo. Thus, the interval between pulsations is the same. However, sinus arrhythmia is a common condition in children, adolescents, and young adults. Sinus arrhythmia involves an irregular pulse rhythm in which the pulse rate varies with the respiratory cycle; the heart rate increases at inspiration and decreases back to normal upon expiration. The underlying physiology of sinus arrhythmia is that the heart rate increases to compensate for the decreased stroke volume from the heart’s left side upon inspiration.
You count the pulse rate for thirty seconds if the rhythm is regular (even tempo) and multiply by two to report in beats per minute. Count for one minute if the rhythm is irregular. In children, pulse is counted for one minute considering that irregularities in rhythm are common. When the clock is at zero, you say zero and then, the first beat felt by your fingers is counted as one.
The pulse force is the strength of the pulsation felt when palpating the pulse. For example, when you feel a patient’s pulse against your fingers, is it gentle? Can you barely feel it? Alternatively, is the pulsation very forceful and bounding into your fingertips? The force is important to assess because it reflects the volume of blood, the heart’s functioning and cardiac output, and the arteries’ elastic properties. Remember, stroke volume refers to the volume of blood pumped with each contraction of the heart (i.e., each heartbeat). Thus, pulse force provides an idea of how hard the heart must work to pump blood out of the heart and through the circulatory system.
Pulse force is recorded using a four-point scale:
- 3+ Full, bounding
- 2+ Normal/strong
- 1+ Weak, diminished, thready
- 0 Absent/non-palpable.
Practice with many people to become skilled in measuring pulse force. While learning, it is helpful to assess pulse force along with an expert because there is a subjective element to the scale. A 1+ force (weak and thready) may reflect a decreased stroke volume and can be associated with conditions such as heart failure, heat exhaustion, or hemorrhagic shock, among other conditions. A 3+ force (full and bounding) may reflect an increased stroke volume and can be associated with exercise and stress, as well as abnormal health states including fluid overload and high blood pressure.
Pulse equality refers to whether the pulse force is comparable on both sides of the body. For example, palpate the radial pulse on the right and left wrist at the same time and compare whether the pulse force is equal. Pulse equality is assessed because it provides data about conditions such as arterial obstructions and aortic coarctation. However, the carotid pulses should never be palpated at the same time as this can decrease and/or compromise cerebral blood flow.
Technique
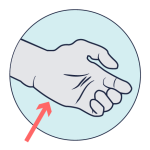
Use the pads of your first three fingers to gently palpate the radial pulse. The pads of the fingers are placed along the radius bone, which is on the lateral side of the wrist (the thumb side; the bone on the other side of the wrist is the ulnar bone). Place your fingers on the radius bone close to the flexor aspect of the wrist, where the wrist meets the hand and bends. Press down with your fingers until you can best feel the pulsation. Note the rate, rhythm, force, and equality when measuring the radial pulse.
You may need to adjust the pressure of your fingers when palpating the radial pulse if you cannot feel the pulse. For example, sometimes pressing too hard can obliterate the pulse (make it disappear). Alternatively, if you do not press hard enough, you may not feel a pulse. You may also need to move your fingers around slightly. Radial pulses are difficult to palpate on newborns and children under five, so healthcare providers usually assess the apical pulse or brachial pulse of newborns and children.
Temperature
Nurses measure a patient’s temperature because it can give information about their state of health and influence clinical decisions. Accurate measurements and interpretation are vital so that hyperthermia and hypothermia can be identified, and appropriate interventions determined.
Hyperthermia refers to an elevated body temperature. It can be related to an internal or external source. External sources that increase body temperature could include exposure to excessive heat on a hot day or being in a sauna or hot tub. Internal sources that may increase body temperature include fever caused by an infection or tissue breakdown associated with physical trauma (e.g., surgery, myocardial infarction) or some neurological conditions (e.g., cerebral vascular accident, cerebral oedema, brain tumour). Hyperthermia associated with an infectious agent, such as a bacteria or virus (e.g., the flu) is referred to as febrile. Unresolved hyperthermic body states can lead to cell damage.
Hypothermia refers to a lowered body temperature. It is usually related to an external source like being exposed to the cold for a long time. Hypothermia is sometimes purposefully induced during surgery or, for certain medical conditions, to reduce the body’s need for oxygen. Unresolved hypothermic body states can slow cellular processes and lead to loss of consciousness.
Method
Methods of measuring a patient’s body temperature vary based on developmental age, cognitive functioning, level of consciousness, state of health, safety, and agency/unit policy. The nurse chooses the best method after considering patient safety, accuracy, and least invasiveness, all contingent on the patient’s health and illness state. Methods of measurement include oral, axillary, tympanic, rectal, and dermal routes (Figure 11). It is best to engage in a discussion with the institution and the unit that you work in about what methods they use and why.
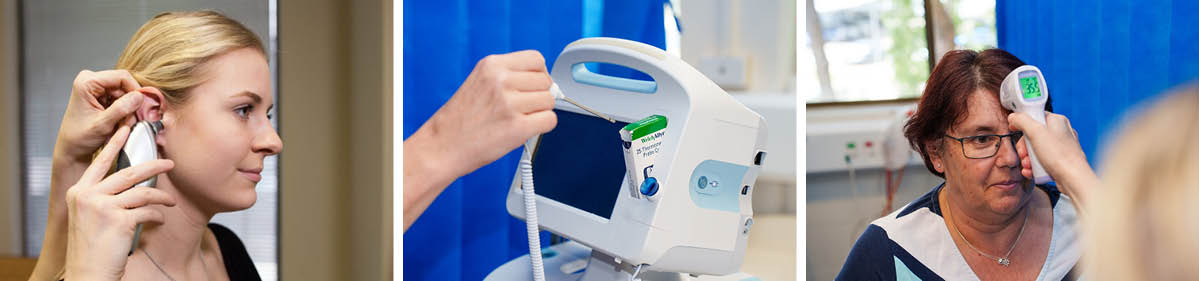
Oral temperature can be taken with patients who can follow instructions, so this kind of measurement is common for patients over the age of four, or even younger children if they are cooperative. Usually with a stable child or in a routine situation (and the patient can follow instructions – about age four), then, most likely, you would do oral temperature. However, you would avoid an oral route with a confused patient who may not understand the purpose of placing an item in their mouth and risk biting the thermometer. In these cases, you may take a tympanic or axillary route; these routes are also preferable when a patient is on oxygen delivered via a face mask (a mask that covers the nose and mouth) because this can alter the temperature. Tympanic routes are common in the adult population both in primary settings and acute settings.
For children younger than four who are stable, axillary temperature is commonly measured unless a more accurate reading is required. Tympanic measurement is fast and convenient and therefore is an appropriate choice if paediatric equipment is available. Rectal temperatures are most accurate however due to the invasiveness and risk of injury during this procedure are only to be used when other options are exhausted.
Dermal routes are alternative methods of measurement that may be used in some agencies and practice areas. This method can involve holding the device and sliding it over the skin of the forehead and then down over the temporal artery in one motion. Dermal strips can also be placed on the forehead to measure skin temperature, but are not yet widely used, and the accuracy of this method has not yet been verified. More recently, there has been an increase in non-contact infrared thermometers particularly in the era of COVID-19 and other highly transmissible diseases. Depending on the type, these thermometers can be held at a short distance from the forehead or temporal area to measure temperature. Alternatively, some handheld thermal scanners that use an infrared camera can be held at a greater distance to screen large masses of people. Please refer to the manufacturer’s suggested reference range for non-contact infrared thermometers and thermal scanners.
Temperature Ranges
The human body’s core temperature (internal body temperature) is measured in degrees Celsius (ºC).
In adults, the normal core body temperature (referred to as normothermia or afebrile) is 36.5–37.5ºC. (Figure 12).
A wider temperature range is acceptable in infants and young children and can range from 35.5–37.7ºC. Infants and children have a wider temperature range because their heat control mechanisms are less effective. They are at risk for heat loss for many reasons including having less subcutaneous fat than adults, a larger body surface area in comparison to weight (and larger head size in proportion to the rest of the body), immature metabolic mechanisms (e.g., inability to shiver), and limited ability to produce heat through activity. They are also at risk of excessive heat production due to crying and restlessness as well as external factors such as being wrapped in too many blankets. The following temperature methods and normal ranges are listed below according to the method:

Key Takeaways
In this chapter, we covered:
- The four objective assessment techniques are: inspection (visual observation), palpation (touching to assess characteristics), percussion (tapping to identify sounds), and auscultation (listening with a stethoscope).
- Inspection involves observing body position, posture, gait, symmetry, skin condition, behaviour, and hygiene.
- Palpation helps assess temperature, texture, moisture, swelling, elasticity, lumps, organ size, density, and pain.
- Percussion involves tapping the body to produce sounds that reveal the nature of organs (air-filled, fluid-filled, or dense) and help identify abnormal masses, organ enlargement, or the presence of fluid.
- Auscultation uses a stethoscope to listen for high-pitched and low-pitched sounds in places like the lung, bowel, and heart to identify normal and abnormal physiological sounds, such as breath sounds, bowel activity, and heart murmurs.
- The primary survey (Airway, Breathing, Circulation, Disability, and Exposure) is the first step in the objective assessment.
- After stabilising the patient, a general survey is performed, focusing on appearance, behaviour, mobility, and communication.
- Vital signs: How to assess a patients temperature, pulse, respiratory rate, blood pressure and oxygen saturation along with understanding the different ranges for each.
- Lifespan considerations (children, adolescents, and older adults) require adapting the assessment techniques as appropriate.
References
World Health Organization. (2023). Hypertension. https://www.who.int/news-room/fact-sheets/detail/hypertension
Media Attributions
- Objective Assessment Techniques © Eileen Siddins is licensed under a CC BY-NC (Attribution NonCommercial) license
- Percussion Technique © Ben Green is licensed under a CC BY-NC-SA (Attribution NonCommercial ShareAlike) license
- Percussion Locations © Eileen Siddins is licensed under a CC BY-NC (Attribution NonCommercial) license
- Stethoscope © Medisave is licensed under a CC BY (Attribution) license
- ABCDE Survey © David Peran, Jiri Kodet, Jaroslav Pekara, Lucie Mala, Anatolij Truhlar, Patrik Christian Cmorej, Kasper Glerup Lauridsen, Ferenc Sari & Roman Sykora adapted by Eileen Siddins is licensed under a CC BY (Attribution) license
- Vital Signs Machine © Ben Green is licensed under a CC BY-NC (Attribution NonCommercial) license
- Pluse Oximeter © US Agency for International Development is licensed under a CC0 (Creative Commons Zero) license
- Blood Pressure Cuffs © Ben Green is licensed under a CC BY-NC (Attribution NonCommercial) license
- Manual Blood Pressure © Ben Green is licensed under a CC BY-NC (Attribution NonCommercial) license
- Pulse Points © Eileen Siddins is licensed under a CC BY-NC (Attribution NonCommercial) license
- Thermometer Examples © Ben Green is licensed under a CC BY-NC (Attribution NonCommercial) license
- Temperature Regulation © OpenStax adapted by Eileen Siddins is licensed under a CC BY (Attribution) license
