Infection Prevention and Control
Leisa Sanderson and Penelope Coogan
Learning Outcomes
In this chapter, you will learn how to:
- Explain the process of infection transmission using the chain of infection concept
- Identify the body’s normal defences against infection
- Identify nursing interventions that reduce the transmission of infection
- Demonstrate understanding of standard and transmission-based precautions
- Demonstrate effective hand hygiene, donning and removing personal protective equipment (PPE)
- Recognise key concepts related to asepsis, aseptic fields, and Aseptic Non-Touch Technique (ANTT).
Introduction
Infection prevention and control refers to practices that can prevent or reduce the risk of transmission of microorganisms. Evidence-based best practices for infection prevention and control provide guidelines to healthcare providers to ensure safe, quality care is provided to patients, visitors, healthcare providers, and the healthcare environment. When infection prevention and control practices are used consistently, the transfer of healthcare-associated infections (HAIs) can be prevented in healthcare settings.
Nurses are on the front line of infection prevention and control. Nurses play an essential role in the prevention of infectious diseases and therefore it is crucial for nurses to understand how infectious diseases spread to ensure vigilance in performing proactive initiatives to prevent and control infections. Microorganisms play a major role in the transmission of diseases and by understanding the conditions that foster the spread of infection, nurses can implement evidence-based interventions to break the cycle and stop the chain of infection. The process of infection control includes handwashing, environmental sanitising, proper waste management, and adherence to isolation precautions. The main goal of infection prevention for nurses is to prevent the transmission of diseases. Nurses must understand how infections occur and how infection-prevention protocols work to prevent such infections. In doing so, they will ultimately protect themselves and their patients against exposure to infectious agents. Such knowledge includes an understanding of the infection cycle, how and why infections manifest, use of personal protective equipment (PPE), use of aseptic and sterile techniques, and the most effective way to control infections. While proper handwashing is a critical component of infection prevention, there are also several other ways that nurses can stem the spread of infection and protect themselves and their patients.
Chain of Infection
The presence of a pathogen does not always lead to infection. For infection to occur a cyclic process is required. This cyclic process is called the chain of infection and consists of the following:
- Infectious agent
- Reservoir
- Portal of exit
- Mode of transmission
- Portal of entry
- Susceptible host.
An understanding of how an infectious agent travels throughout the cycle is required to determine how to break the chain and prevent the transmission of an infectious disease. If a part of the chain of transmission is broken, the infection will not occur. Routine practices and additional precautions are used to break or minimise the chain of infection.
Click or tap on the ‘+’ buttons below for detailed information on each link in the chain of infection and how nurses can assist in breaking these links.
The spread of germs in healthcare settings can occur through various routes, including direct contact, airborne particles, and contaminated surfaces.
Nature of Infection
An infection is the invasion and growth of a microorganism within the body. Infection can lead to disease that causes signs and symptoms, resulting in a deviation from the normal structure or functioning of the host. Infection occurs when nonspecific innate immunity and specific adaptive immunity defences are inadequate to protect an individual against the invasion of a pathogen. The ability of a microorganism to cause disease is called pathogenicity, and the degree to which a microorganism is likely to become a disease is called virulence. Virulence is a continuum, on one end of the spectrum are organisms that are not harmful, but on the other end are organisms that are highly virulent. Highly virulent pathogens will almost always lead to a disease state when introduced to the body, and some may even cause multi-organ and body system failure in healthy individuals. Less virulent pathogens may cause an initial infection but may not always cause severe illness. Pathogens with low virulence usually result in mild signs and symptoms of disease, such as a low-grade fever, headache, or muscle aches, and some individuals may even be asymptomatic.
Depending on the extent of the infection, infections can be described in three ways:
Stages of Infection
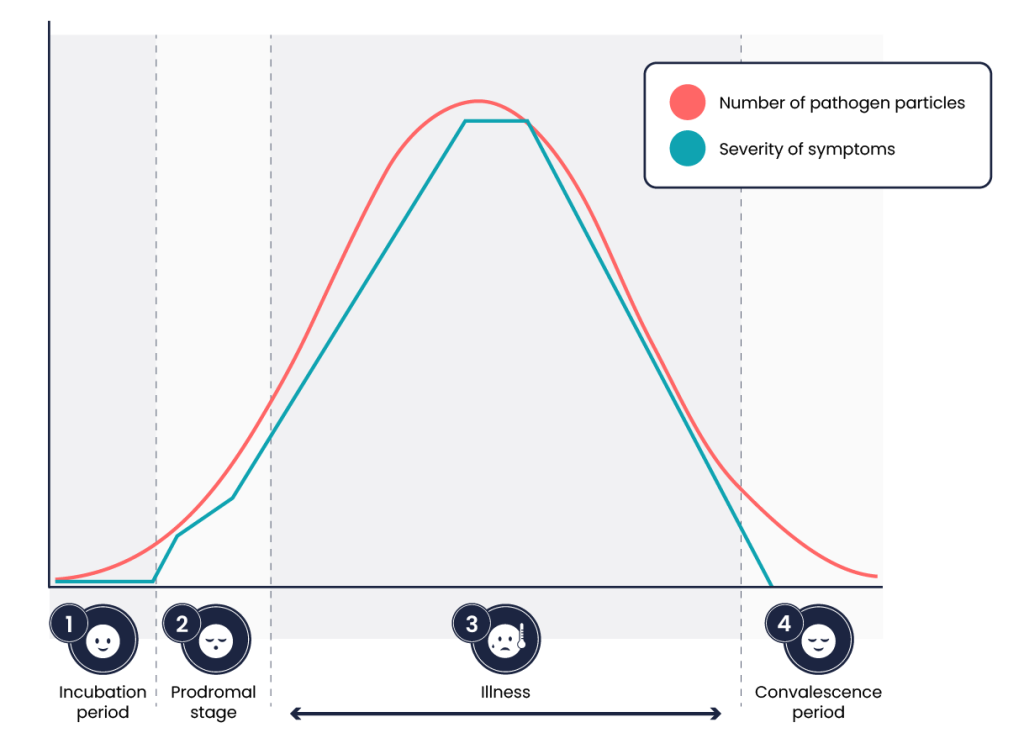
All infections progress through a predictable course of four stages. Each pathogen can produce distinct and diverse symptoms. An individual’s immune response to the pathogen will determine the length and intensity of each stage and account for variability seen between one individual and another.
 |
Incubation Period The stage of infection known as the incubation period begins once a pathogen successfully enters a new host. During the incubation period, a person does not show signs and symptoms of an infection because there are not enough pathogens to cause symptoms. The person therefore does not suspect they have been infected. One example is the common cold. The patient feels healthy for one to three days but then starts to demonstrate symptoms of illness once the level of pathogen has increased in their system. Despite being asymptomatic those first few days, pathogens are continually multiplying and can still be spread to other hosts. Because of this, the longer the incubation period is, the more likely a person is to be unknowingly spreading infection to other people. The incubation period can vary from as little as one day, as with the influenza virus, to two to three months, as with the hepatitis B virus. It can even last years, as with the human immunodeficiency virus. |
 |
Prodromal Stage The stage of infection called the prodromal period begins at the initial appearance of mild or vague symptoms. These symptoms arise from activation of the immune system and typically present as fever, pain, soreness, or inflammation. Symptoms at this stage are often too general to indicate a specific disease. An example case is the patient exposed to the common cold, after one to three days of feeling healthy, they may then have symptoms such as a headache, scratchy throat, and watery eyes. Though present, these symptoms are nonspecific and could be associated with a variety of other illnesses. This stage can vary in its duration, but it is typically shorter than the incubation period. |
 |
Illness The illness period stage of infection begins when a person experiences the specific signs and symptoms of a certain disease. This period represents the peak of the infection, and it is during this time that a person is highly contagious. In this stage, our patient who was exposed to the common cold will start to show specific symptoms such as mild hacking cough, sneezing, achy muscles and bones, and low-grade fever. If the individual’s immune system (with or without medical intervention) can combat the pathogens, a period of decline in the pathogens begins. The infection begins to weaken, and symptoms decrease. |
 |
Convalescent Period The final stage of infection is the convalescent period. This is the stage where recovery and healing begin. Closing out our example of the patient who has the common cold, the patient’s symptoms will fade, and the patient will report feeling back to baseline. During this time, a person is gradually able to return to their normal functions; some infections, however, can result in permanent damage from which the body is unable to repair and recover.
|
Body’s Natural Defence Mechanism Against Infection
The human body’s immune system provides a mechanism for staying healthy through protection against harmful pathogens. An immune response can be classified as either nonspecific, meaning it targets pathogens in a nonspecific, less effective manner, or specific, which allows for a high level of adaptation and effectiveness. Nonspecific immunity includes physical, chemical, and cellular defences that are classified as either primary or secondary. Secondary defences are broken down further into inflammatory and immune responses. The specific defence would be antibodies from the immune system targeting a specific antigen that they are designed to identify and destroy.
Primary Defences
Primary defence barriers prevent pathogens from entering the body through structural barriers, destroy them once they have entered the body, or flush them out of the body. These barriers are not triggered as a response to pathogens but instead, serve as a continuous first line of defence against infection.
The tabs below outlines the key primary defence barriers, detailing their functions and how they help protect the body from infection.
Secondary Defence Barriers to Infection
Pathogens that are not stopped by primary mechanisms are able to enter the body triggering a second set of defences. Nonspecific, innate immune responses work to recognise and eliminate pathogens. These secondary defences include the inflammatory response, which helps isolate and eliminate pathogens, and the immune response, which targets and destroys specific invaders to protect the body.
Healthcare-Associated Infections
Healthcare-associated infections (HAIs), also known as nosocomial infections, are those that are acquired in healthcare facilities or because of healthcare interventions, which may become evident after people leave the healthcare facility (Shaban et al., 2023). Although preventable, HAIs are some of the most common complications for patients within a healthcare setting and can prolong hospital stays and recovery time. In Australia, there are approximately 165,000 HAIs in acute care facilities each year (Mitchell et al., 2017). Common types of HAIs include Urinary Tract Infections (UTI), Surgical Site Infections (SSI), Pneumonia, Bloodstream infection, Central line and peripheral line associated bloodstream infection, multi-resistant organisms (MROs), infections associated with prosthetics/implantable devices and gastrointestinal infection. Infections can occur with or without an invasive device. Devices where infection is commonly introduced include Urinary catheters, central and peripheral lines, ventilatory support and prosthetic/implantable devices (Australian Commission on Safety and Quality in Health Care [ACSQHC], 2018).
The risk of developing an HAI is dependent on the infection-control policies within a facility and the degree of adherence to them. Additional risk factors include a patient’s immune status, age, underlying comorbidities, and the prevalence of pathogens within the environment. The length of hospitalisation, number of invasive procedures, and amount of antibiotic therapy received all increase a patient’s risk for acquiring an HAI.
Link to Learning
The Global Alliance for Infections in Surgery has outlined seven strategies to prevent healthcare-associated infections in the healthcare setting.
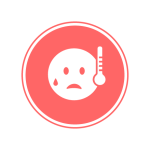
Multi-Resistant Organisms
An organism that develops resistance to one or more classes of antimicrobials is considered a multi-resistant organism. People infected with multi-resistant organisms are more likely to have longer, more expensive hospital stays and may be more likely to die as a result of an infection.
Many factors contribute to resistance, including overprescription of antibiotics for nonbacterial infections, use of inappropriate antibiotics for the infectious microorganism, and lack of completion of prescribed antibiotic therapy. Misuse of antimicrobials is considered one of the world’s most pressing public health problems.
Examples of MRO include Methicillin-resistant Staphylococcus aureus (MRSA), Vancomycin-resistant Enterococci (VRE) and Clostridium difficile (C. Diff).
Antimicrobial Stewardship
Antimicrobial stewardship (AMS) are coordinated programs that promote appropriate prescribing and use of antimicrobials (including antibiotics). Programs have shown to improve patient outcomes, reduce microbial resistance rates and reduce healthcare cost.
In Australia, AMS is a requirement under the National Safety and Quality Health Service (NSQHS) Prevention and Controlling Healthcare-Associated Infection Control standard and is supported by the ACSQHC Antimicrobial Stewardship Clinical Care standard (ACSQHC, 2020).
The nurse plays an important role in antimicrobial stewardship through patient education. For example, many patients expect to receive an antibiotic when they seek treatment for an illness or symptom. However, because antibiotics are only effective in treating bacteria, the patient should be educated regarding effective treatment for the type of pathogen causing their symptoms. If an antibiotic is prescribed, patients should be advised to complete the entire course of therapy or contact their provider if they are unable to do so. For example, patients often feel better after a few days of treatment and decide not to take the remaining medication, or they may experience side effects from the antibiotic (such as nausea and diarrhoea) and stop taking the medication. All these behaviours can lead to antibiotic resistance and should be addressed when educating patients about prescribed antibiotic therapy.
Preventing Healthcare-Associated Infections
The role of nursing in patient safety and infection prevention is significant. Nurses provide care at the bedside and have the direct ability to impact care and influence positive patient outcomes by helping to identify and prevent the spread of infectious agents. The interventions implemented by a nurse have an integral role in infection prevention. Nurses are part of the team responsible for executing appropriate isolation protocols, modelling infection-control measures, monitoring others for safe practice, identifying barriers to appropriate practice, and educating patients and other interdisciplinary team members as needed. Specific protocols for isolation and infection control will depend on several factors including mode of transmission, environmental circumstances, and available resources.
The National Health and Medical Research Council (NHRMC) in consultation with the ACSQHC provide guidelines regarding the prevention and control of infection in healthcare. You may access the Australian Guidelines for the Prevention and Control of Infection in Healthcare on the NHMRC website.
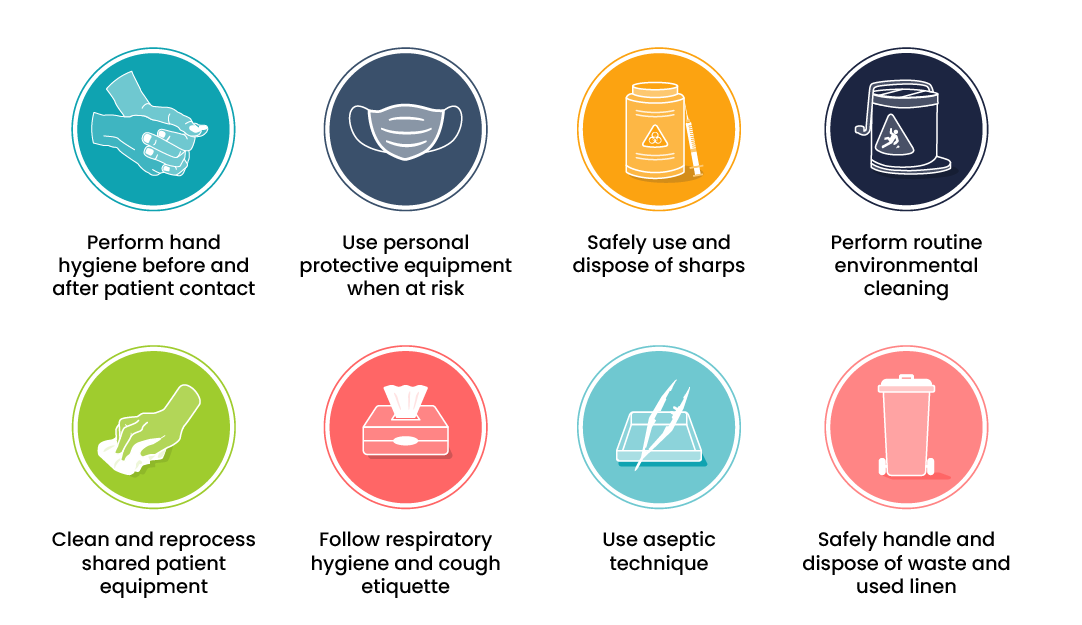
To successfully prevent the transmission of infection, evidence-based infection control practices need to be implemented. These practices are carried out using a two-tiered approach of standard and transmission-based precautions.
Standard precautions are those that are always applied to all people all the time, regardless of their diagnosis or presumed infection status. These standards provide a basic level of protection that reduce the transmission of organisms from one area to another. Transmission-based precautions are required to be implemented in circumstances where standard precautions alone may not prevent the transmission of infection. These precautions are specific to infections and should be implemented immediately following the patient presenting with signs and symptoms of the particular infection. The precautions include contact precautions, droplet precautions and airborne precautions.
Standard Precautions
Hand Hygiene
Hand hygiene is the single most important practice to reduce the transmission of infectious agents in healthcare settings and is an essential element of standard precautions. Hand hygiene refers to the action of cleaning your hands by applying an alcohol-based hand rub (ABHR) or washing your hands with soap or soap solution (ACSQHC, 2024).
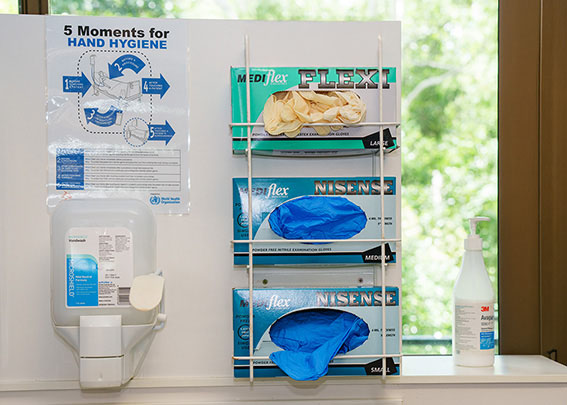
The National Hand Hygiene Initiative (NHHI), established by the ACSQHC, was introduced to prevent and reduce HAI incidents in Australian healthcare settings. The initiative’s key elements are to promote the use of ABHR at the point of care, ensure standardised hand hygiene and infection prevention and control education, monitor hand hygiene compliance, and identify targeted opportunities to improve compliance (ACSQHC, 2024).
The 5 moments of hand hygiene is the theoretical model recommended by the NHHI are based on guidelines produced by the World Health Organisation (WHO). The model considers five of the most critical moments in care where transmission of microorganisms may occur and aims to reduce or prevent transmission at these points (ACSQHC, 2024). Click or tap on the ‘+’ buttons below to read more about the five moments of hand hygiene.
Link to Learning
Every moment of hand hygiene matters.
The following series of videos produced by the ACSQHC explores the 5 moments of hand hygiene and explains why it matters.
Hand Hygiene Moments video series [Each video is 0:49 to 1:16 long]
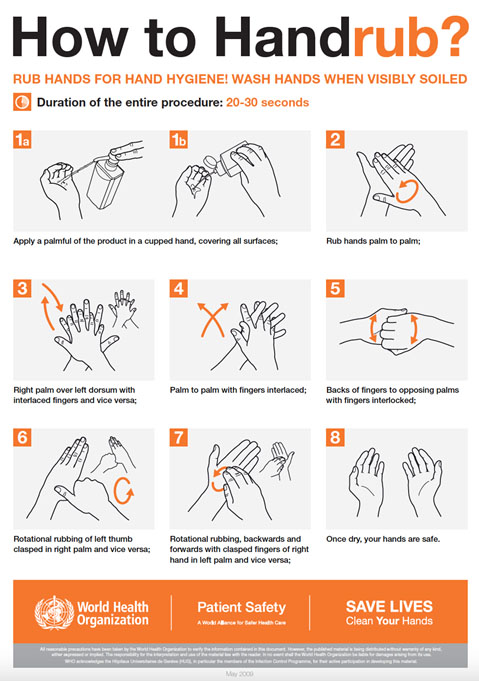
Alcohol–Based Hand Rub
According to the ACSQHC (2024), ABHR is the gold standard in hand hygiene practice and hand washing should be reserved for situations when hands are visibly soiled. This is due to AHBR resulting in a greater reduction of bacterial load, less time required to perform, being gentler on the skin and being more readily accessible. The exception to this is when caring for patients with Clostridioides difficile, non-enveloped viruses, tropical parasites, and protozoan oocysts where soap and water is currently the preferred method.
When using the alcohol-based hand rub method, the following steps are recommended:
- Apply product to the palm of one hand in an amount that will cover all surfaces.
- Rub hands together, covering all the surfaces of the hands, fingers, and wrists until the hands are dry. Surfaces include the palms and fingers, between the fingers, the backs of the hands and fingers, the fingertips, and the thumbs.
- The process should take about 20–30 seconds, and the solution should be dry.
 |
Please note: There is no maximum number of times that ABHR can be used before hands need to be washed with soap and water (ACSQHC, 2024).
Alcohol-based hand rub is the hand hygiene product of choice for all standard aseptic technique procedures (ACSQHC, 2024). |
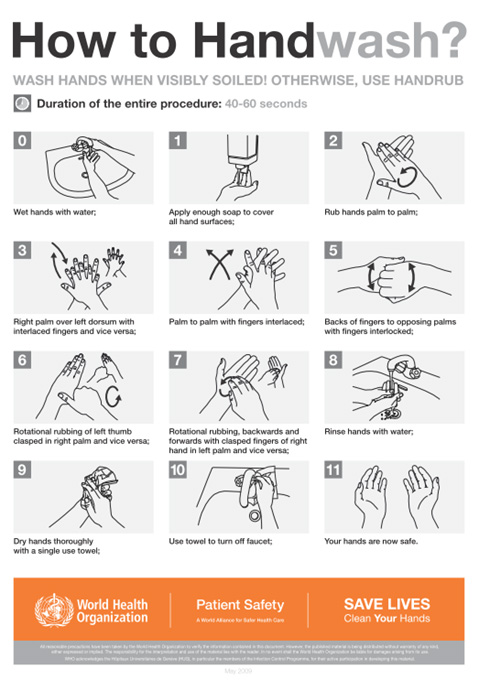
Soap and Water Hand Wash
Soap and water hand wash is recommended when hands are visibly soiled or when caring for patients in which ABHR has demonstrated decreased effectiveness such as Clostridioides difficile, non-enveloped viruses, tropical parasites, and protozoan oocysts.
When washing with soap and water, the following steps are recommended:
- Wet hands with warm or cold running water and apply facility-approved soap.
- Lather hands by rubbing them together with the soap. Use the same technique as the handrub process to clean the palms and fingers, between the fingers, the backs of the hands and fingers, the fingertips, and the thumbs.
- Scrub thoroughly for at least 40–60 seconds.
- Rinse hands well under clean, running water.
- Dry the hands using disposable towelling.
- Use a clean paper towel to shut off the faucet.
 |
Please note: Wet hands more readily spread microorganisms therefore the complete drying of hands is a vital component to the effectiveness of the procedure (ACSQHC, 2024). |
Link to Learning
Please watch this video about hand hygiene [2:01]:
Personal Protective Equipment
Personal protective equipment (PPE) includes gloves, gowns, face shields, goggles, and masks used to prevent the spread of infection to and from patients and healthcare providers. When used for a patient with transmission-based precautions, PPE supplies are typically stored in an isolation trolley next to the patient’s room, and a sign is posted on the door alerting staff and visitors to precautions needed before entering the room. The following section provides detailed information on the proper selection, use, and disposal of PPE to ensure effective infection prevention and control.
Gloves
Gloves protect both patients and healthcare workers from exposure to infectious material that may be carried on the hands. Gloves are used to prevent contamination of healthcare workers’ hands during activities such as the following:
- Anticipating direct contact with blood or body fluids, mucous membranes, nonintact skin, and other potentially infectious material
- Having direct contact with patients who are colonised or infected with pathogens transmitted by the contact route, such as Vancomycin-resistant enterococci (VRE), Methicillin-resistant staphylococcus aureus (MRSA), and Respiratory syncytial virus (RSV)
- Handling or touching visibly or potentially contaminated patient care equipment and environmental surfaces.
Non-sterile disposable medical gloves for routine patient care are made of a variety of materials, such as latex, vinyl, and nitrile. Many people are allergic to latex, therefore clarifying latex allergies for the patient and other healthcare professionals prior to use is required.
The wearing of gloves does not eliminate the need for hand hygiene. The 5 moments of hand hygiene should continue to be followed. Hand hygiene should occur prior to donning and after removing gloves. Gloves are considered single-use and must not be washed for subsequent reuse as microorganisms cannot be reliably removed from glove surfaces, and continued glove integrity cannot be ensured. Gloves may need to be changed when providing care to a single patient to prevent cross-contamination between body sites. It is also necessary to change gloves if the patient interaction requires touching portable computer keyboards or other mobile equipment that is transported from room to room. Discarding gloves between patients is necessary to prevent transmission of infectious material.
Applying Medical Gloves (Non-Sterile):
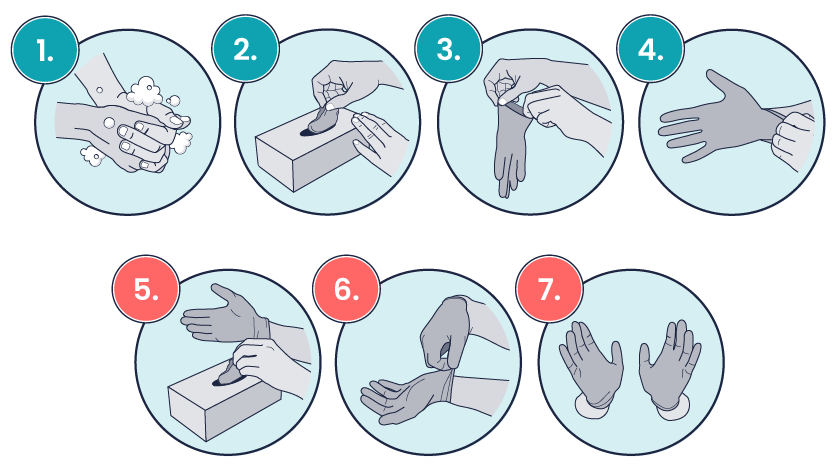
1. Before donning gloves, use an alcohol-based handrub or soap and water to perform hand hygiene.
2. Take out a glove from its original box.
3–4. Touch only the top edge of the glove corresponding to the wrist to don the first glove.
5–6. Take the second glove with your ungloved hand and touch only part of the glove corresponding to the wrist. While donning the second glove, hook the fingers of your gloved hand on the external part of the glove to avoid touching your forearm.
7. Once gloved, do not touch anything that is not assigned for appropriate glove use.
When gloves are worn in combination with other PPE, they are put on last. Gloves that fit snugly around the wrist should be used in combination with isolation gowns because they will cover the gown cuff and provide a more reliable continuous barrier for the arms, wrists, and hands.
Removing Medical Gloves
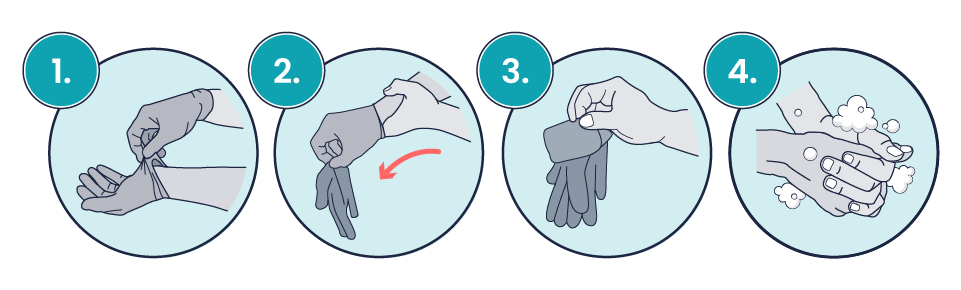
- Pinch one glove at the wrist level to remove it, without touching the skin of the forearm, and peel away from the hand, thus allowing the glove to turn inside out.
- Hold the removed glove in the gloved hand and slide the fingers of the ungloved hand inside between the glove and the wrist. Remove the second glove by rolling it down the hand and fold into the first glove.
- Discard the removed gloves.
- Perform hand hygiene by rubbing with an alcohol-based handrub or by washing with soap and water.
Gowns
Protective clothing (apron/gowns) are recommended for healthcare workers in the following situations:
- Will come into close contact with patients, material, or equipment that may lead to contamination of skin or clothing
- At risk of exposure to blood, body substances, or excretions
- Required for contact-based transmission precautions.
Aprons/gowns are provided in several forms and will be selected depending on the activity to be undertaken and the patient’s infectious status.
Types of aprons/gowns available include:
- Plastic apron: Worn when there is a low risk of exposure to blood or body substance to protect the healthcare worker’s clothing
- Gown: Worn to protect the healthcare worker’s body areas and clothing from blood, body substance, and potential infectious material when splashing is likely
- Full body gown: Worn when extensive skin-to-skin contact is expected or there is a likelihood of extensive splashing of body substances
- Sterile gown: Worn when a surgical aseptic field is required.
All gowns used in clinical settings should be impervious to fluid.
Isolation gowns are used to protect the healthcare worker’s arms and exposed body areas and to prevent contamination of their clothing with blood, body fluids, and other potentially infectious material. When using standard precautions, an isolation gown is worn only if contact with blood or body fluid is anticipated. However, when contact transmission-based precautions are in place, donning both gown and gloves upon room entry is indicated to prevent unintentional contact of clothing with contaminated environmental surfaces.
Gowns are usually the first piece of PPE to be donned. Isolation gowns should be removed before leaving the patient’s room to prevent possible contamination of the environment outside. Isolation gowns should be removed in a manner that prevents contamination of clothing or skin. The outer, “contaminated,” side of the gown is turned inward and rolled into a bundle, and then it is discarded into a designated container to contain contamination. See donning and doffing your PPE for further instructions.
Masks
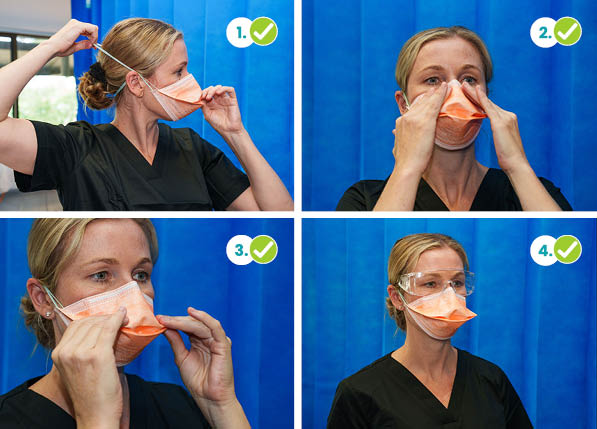
The mucous membranes of the mouth, nose, and eyes are susceptible portals of entry for infectious agents. Masks are used to protect these sites from entry of large infectious droplets. Masks have three primary purposes in healthcare settings:
- Used by healthcare personnel to protect them from contact with infectious material from patients (e.g., respiratory secretions and sprays of blood or body fluids), consistent with standard precautions and droplet transmission precautions
- Used by healthcare personnel when engaged in procedures requiring sterile technique to protect patients from exposure to infectious agents potentially carried in a healthcare worker’s mouth or nose
- Placed on coughing patients to limit potential dissemination of infectious respiratory secretions from the patient to others in public areas (i.e., respiratory hygiene).
Masks may be used in combination with goggles or a face shield to provide complete protection for the face. General surgical masks differ from respirators which are used during airborne transmission-based precautions to prevent inhalation of small, aerosolised infectious droplets.
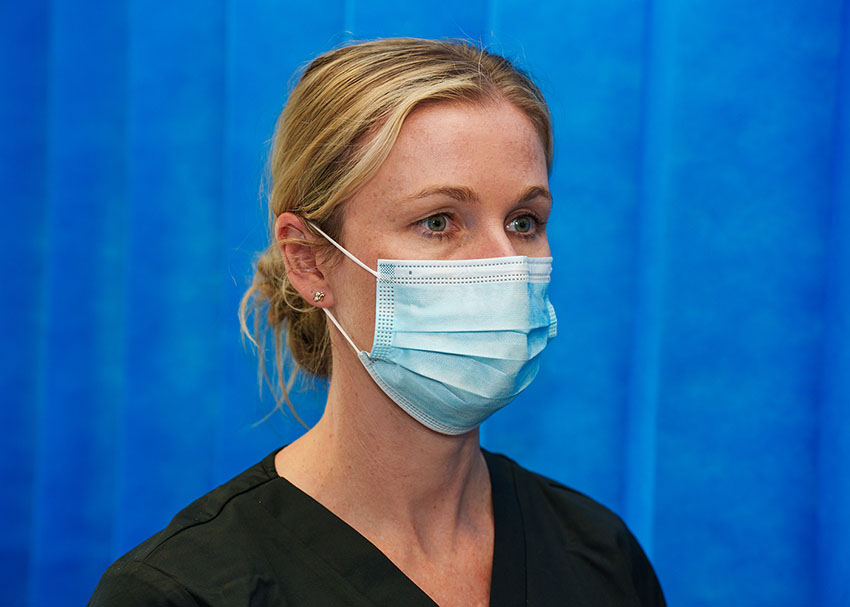
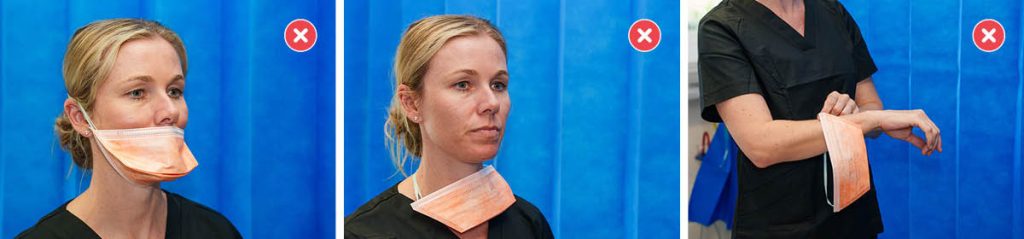
It is important to properly wear and remove masks to avoid contamination. Some considerations when wearing a mask include:
- Change mask between patients and when soiled or wet
- Masks are single-use, do not reapply once removed
- Do not dangle the mask under the nose, chin, around the neck or store it on arms/elbows
- Once applied, do not touch the front of the mask
- Perform hand hygiene upon touching or discarding a used mask. (NHMRC, 2019).
Particle Filter Respirators
P2 or N95 respirators are worn to provide respiratory protection to healthcare workers during procedures that are likely to involve aerosolisation of pathogens, and/or when caring for patients with a known or suspected airborne transmission agent. A respirator mask such as the P2 or N95 has significantly higher particle filtration than a standard surgical mask; however, it must be fitted correctly for maximum effectiveness. A formal ‘fit test’ for these masks is a common annual requirement in many Australian healthcare facilities. Fit checking is required as part of the standard donning process. It is important to apply, wear, and remove respirators appropriately to avoid contamination. The following considerations should be made when wearing a Respirator:
- If a good seal cannot be made, an alternative should be considered.
- Respirators require changing when they become moist.
- Respirators should not be reused.
- Do not wear a respirator under the nose, around the neck, or stored on arms/elbows.
- Hand hygiene is required after the touching/disposal of the respirator (NHMRC, 2019).
To apply and fit check your P2 or N95 mask correctly:
- Perform hand hygiene
- Select an appropriately sized P2/N95 mask
- Separate the edges and straps
- Hold respirator on face
- Place the top strap above the ears on top of the head
- Place the bottom strap below the ears
- Conform nose piece to shape of nose using fingertips of both hands (avoid pinching with one hand)
- Once a good facial fit is achieved, perform a fit check
- Exhale sharply. The respirator should fill with air—adjust if there is leakage.
- Inhale deeply. The respirator should draw in and slightly collapse towards the face—adjust if air entry occurs through gaps (NHMRC, 2019).
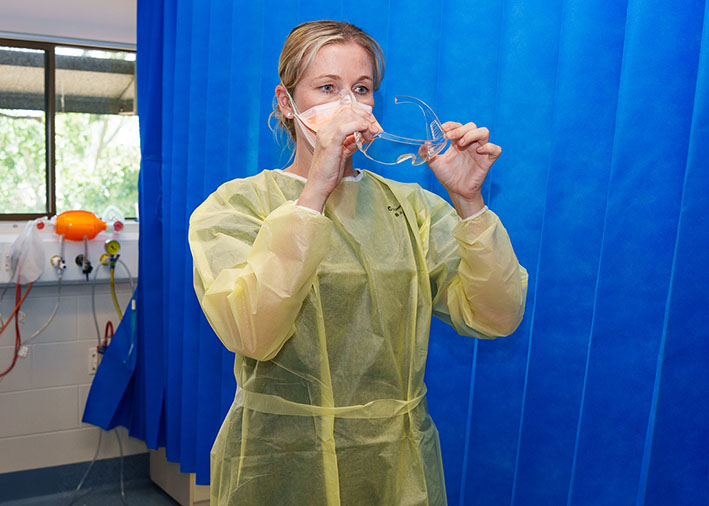
Goggles/Face Shields
Eye protection may be required for situations where exposure through splashing may occur. The chosen protection will depend upon circumstances such as risk of exposure, other PPE used, and personal vision needs. Personal eyeglasses and contact lenses are not considered adequate eye protection. Most goggles will fit over prescription eyewear. For goggles to be efficient, they must fit snuggly, particularly from the corners of the eye and across the brow (NHMRC, 2019). Face shields can offer additional protection to other parts of the face as well as the eyes if required.

How to Put On (Don) PPE
More than one donning method for putting on PPE may be acceptable. Follow facility policy for donning PPE according to transmission-based precautions. The following order of application is currently recommended by the NHMRC (2019):
- Identify and gather the proper PPE to don. Ensure the gown size is correct.
- Perform hand hygiene using ABHR or soap and water (ABHR is the preferred hand hygiene method unless hands are visibly soiled).
- Put on the isolation gown. Tie all the ties on the gown. Assistance may be needed by other healthcare personnel to tie back ties.
- Based on specific transmission-based precautions and facility policy, put on a surgical mask or P2/N95 respirator. The top strap should be placed on the crown (top) of the head, and the bottom strap should be at the base of the neck. If the mask has loops, hook them appropriately around your ears. Masks and respirators should extend under the chin, and both your mouth and nose should be protected. Perform a user-fit check each time you put on a respirator. If the respirator has a nosepiece, it should be fitted to the nose with both hands, but it should not be bent or tented. Masks typically require the nosepiece to be moulded to fit around the nose but do not pinch the nosepiece of a respirator with one hand.
- Put on a face shield or goggles when indicated. When wearing an N95 respirator with eye protection, select eye protection that does not affect the fit or seal of the respirator and one that does not affect the position of the respirator. Goggles provide excellent protection for the eyes, but fogging is common. Face shields provide full-face coverage.
- Put on gloves. Gloves should cover the cuff (wrist) of the gown.
- You may now enter the patient’s room.
How to Remove (Doff) PPE
More than one doffing method for removing PPE may be acceptable. Use the facility policy for the doffing procedure. The following order of removal is currently recommended by the NHMRC (2019):
- Remove the gloves as per the instructions above.
- Perform hand hygiene.
- Remove the gown by unfastening the ties. Pull away from the neck and shoulders touching only the inside of the gown. While pulling the gown down from the shoulders/arms, turn the gown inside out, then roll it into a bundle and dispose of it in an appropriate waste receptacle.
- Perform hand hygiene.
- Carefully remove the face shield or goggles by grabbing the strap and pulling upwards and away from the head. Do not touch the front of the face shield or goggles.
- If the PPE was contaminated perform hand hygiene.
- Remove the respirator or face mask. Do not touch the front of the respirator or face mask. Remove the bottom strap by touching only the strap and bringing it carefully over the head. Grasp the top strap and bring it carefully over the head, and then pull the respirator away from the face without touching the front of the respirator. For masks, carefully untie (or unhook ties from the ears) and pull the mask away from your face without touching the front. Discard it in the appropriate waste receptacle.
- Perform hand hygiene.
Removal of PPE should be carried out at the doorway of the patient’s room just prior to leaving or immediately outside the room.
Link to Learning
Donning and doffing PPE: Standard precautions
The following video created by the Department of Health, Tasmania, provides a clear demonstration of donning and doffing your PPE [7:23]:
Handling and Disposal of Sharps
Injuries due to needles and other sharps have been associated with the transmission of blood-borne infectious agents, including hepatitis B virus, hepatitis C virus, and human immunodeficiency virus (HIV) to healthcare personnel. The prevention of sharps injuries is an essential element of standard precautions and includes measures to handle needles, scalpels and other sharp instruments/devices in a manner that will prevent injury to the user and to others who may encounter the device during or after a procedure.
 |
Safety devices should be considered that minimise the risk of injury. Standard measures to decrease the risk of injury include:
|
If you do sustain a needle stick or other sharp injury or are exposed to blood or other potentially infectious materials in your eyes, nose, mouth, or on broken skin, immediately flood the exposed area with water and clean any wound with soap and water. Do not squeeze the affected area. Report the incident immediately to your supervisor and seek immediate medical attention according to facility policy. Complete appropriate accident/incident forms.
Environmental Control
Transmission of infectious agents from the environment can occur either directly or indirectly. Routine cleaning and disinfecting of all surfaces in patient-care areas is required. The level of cleaning required is determined by the object involved and the risk of contamination. Frequently touched surfaces, especially those closest to the patient, such as bedrails, bedside tables, commodes, doorknobs, sinks, surfaces, and equipment used in patient care, require more frequent cleaning than general surfaces and fittings. Thorough cleaning of all areas is undertaken between patients in acute care settings.
Shared medical equipment and instruments/devices must be cleaned between patient use to prevent patient-to-patient transmission of infectious agents. For example, stethoscopes, blood pressure cuffs and thermometers should be cleaned before and after use for all patients. Patients who have transmission-based precautions should have dedicated medical equipment that remains in their room (e.g., stethoscope, blood pressure cuff, thermometer). When dedicated equipment is not possible, such as a unit-wide bedside blood glucose monitor, disinfection after each patient’s use must be performed according to agency policy.
Process of Spills Management
Decontamination is required when spills of blood or body substances (e.g., vomit, urine) occur. Strategies for management will depend on the setting in which it occurs and the size of the spill. Manage small spills by spot cleaning with a detergent solution. Large spills require more extensive cleaning. Spill kits are readily available in each clinical area, and spills are managed per that clinical area protocol (e.g. Oncology will have a cytotoxic spill kit requirement). A spill kit, in general, contains a scoop and scraper, single-use gloves, protective apron, surgical mask, eye protection, absorbent agent, clinical waste bags and ties, and detergent. All parts are disposable to decrease the risk of cross-contamination (NHMRC, 2019).
 |
When attending to a large spill, the healthcare worker should:
|
Reprocessing of Reusable Equipment and Instruments
The reprocessing requirement for medical devices that are classed as reusable depends on the degree to which the item poses a risk of causing infection. Medical devices fall into one of the following categories and must be reprocessed accordingly.
- Critical items pass into sterile tissue or enter the vascular system. These items must be sterile when used. Examples include various surgical equipment such as laparoscopes, arthroscopes, ultrasound probes.
- Semi-critical items contact mucous membranes or non-intact skin. These items require sterilisation after each use; in some cases, high-level disinfection may be acceptable. Examples include respiratory therapy and anaesthesia equipment, transrectal/transvaginal probes, and cystoscopes.
- Non-critical items contact intact skin only; they do not contact mucous membranes. These items require thorough cleaning after each use. Examples include stethoscopes, sphygmomanometers, commodes, and bedpans.
Reusable medical devices require Therapeutic Goods Administration (TGA) approval and must be reprocessed according to manufacturer advice. No item marked as single-use should be reprocessed (NHRMC, 2019).
Respiratory Hygiene and Cough Etiquette
Respiratory hygiene targets patients, accompanying family members and friends, and healthcare workers with undiagnosed transmissible respiratory infections. It applies to any person with signs of illness, including cough, congestion, rhinorrhoea, or increased production of respiratory secretions when entering a healthcare facility.
 |
The elements of respiratory hygiene include the following:
|
As a registered nurse, you can assist in etiquette compliance by educating other healthcare facility staff, patients, and visitors. Ensure signage is viewable in language(s) appropriate to the population served, with instructions to patients and accompanying family members or friends. Provide control measures for a coughing person (e.g., covering the mouth/nose with a tissue when coughing and prompt disposal of used tissues or applying surgical masks on the coughing person to contain secretions). Ensure spatial separation is possible for persons with respiratory infections in common waiting areas when possible. Undertake good hand hygiene and encourage others to do the same.
Healthcare personnel with viral respiratory infections are advised to remain home until symptoms are resolved (NHRMC, 2019).
Aseptic Technique
In addition to using standard precautions and transmission-based precautions, aseptic technique is used to prevent contamination and transfer of pathogens to the patient from caregiver hands, surfaces, and equipment during routine care or procedures. For example, a nurse administering parenteral medication or performing urinary catheterisation will use the aseptic technique. When performed correctly, the aseptic technique reduces the amount of potential pathogenic microorganisms in an area to an amount insufficient to cause infection and prevents the transfer of those pathogens to a susceptible host.
There is often a misunderstanding between aseptic and sterile techniques in the healthcare setting. To gain an understanding, it may be best to first define the terms Aseptic and sterile.
Asepsis is defined as freedom from infection or pathogenic material. The term sterile refers to an area or item free from all microorganisms. As is seen, asepsis and sterility are closely related, with the shared concept being the removal of harmful microorganisms that can cause infection. Aseptic technique involves minimising the number of harmful pathogens in an area and creating protective barriers to prevent the spread of pathogens.
Sterile technique on the other hand seeks to eliminate every potential microorganism in and around a sterile field while also maintaining objects as free from microorganisms as possible. Sterile conditions are difficult to create and are only truly achievable in controlled environments with the use of laminar flow hoods or in operating theatres.
Principles of Aseptic Non-Touch Technique
The aseptic non-touch technique (ANTT) is a commonly used aseptic technique framework in the healthcare setting and is considered a global standard. There are two types of ANTT: standard-ANTT and surgical-ANTT.
ANTT starts with a few concepts that must be understood before it can be applied. For all invasive procedures, the “ANTT-approach” identifies key parts and key sites throughout the preparation and implementation of the procedure. A key part is any sterile part of equipment used during an aseptic procedure, such as needle hubs, syringe tips, needles, and dressings. A key site is any nonintact skin, potential insertion site, or access site used for medical devices connected to the patients. Examples of key sites include open wounds and insertion sites for intravenous (IV) devices and urinary catheters.
Preparing and Preventing Infections Using Aseptic Technique
The aseptic technique requires five essential principles to be effective:
- Sequencing
- Environmental control
- Hand Hygiene
- Maintenance of aseptic fields
- PPE.
When planning for any procedure, careful thought and preparation of many infection control factors must be considered beforehand. While keeping standard precautions in mind, identify anticipated key sites and key parts to the procedure. Consider the degree to which the environment must be managed to reduce the risk of infection, including the expected degree of contamination and hazardous exposure to the healthcare provider. Finally, review the expected equipment needed to perform the procedure, the complexity of the procedure and the level of key part or key site handling that will be required.
Aseptic Fields
An aseptic field is a controlled workspace created for the management of key parts or key sites during clinical procedures. The complexity of the procedure will determine which of the three commonly used fields is required.
 |
|
Creating and maintaining the aseptic field is foundational to the aseptic technique and encompasses practice standards that are performed immediately prior to and during a procedure to reduce the risk of infection, these include:
- Handwashing
- Using sterile barriers, including drapes and appropriate personal protective equipment
- Preparing the patient, including use of approved antimicrobial products
- Maintaining sterility of the field and objects within it
- Using aseptically safe techniques.
Sterile Gloves
Sterile gloves are required to meet TGA requirements for sterilisation and are used for invasive procedures or when contact with a sterile site, tissue, or body cavity is anticipated. Sterile gloves are used in these instances to prevent transient flora and reduce resident flora contamination during a procedure, thus preventing the introduction of pathogens. For example, sterile gloves are required when performing central line dressing changes, insertion of urinary catheters, and during invasive surgical procedures.
Sterile gloves are not typically required in a standard ANTT procedure, however, they are required for surgical ANTT procedures (NHMRC 2019).
Sterile gloves are typically donned in an open manner in the general clinical environment. In the surgical environment when sterile gowns are also required, a closed donning method is utilised.
Applying Sterile Gloves
View the steps below for donning sterile gloves.
Clinical Waste and Linen
Clinical waste requires careful disposal according to healthcare facility policies. Australian healthcare facilities’ waste management policies are guided by each state and territory legislation and regulations.
 |
In general, the Australian guidelines for the prevention and control of infection (2019) recommend the following apply when managing waste:
|
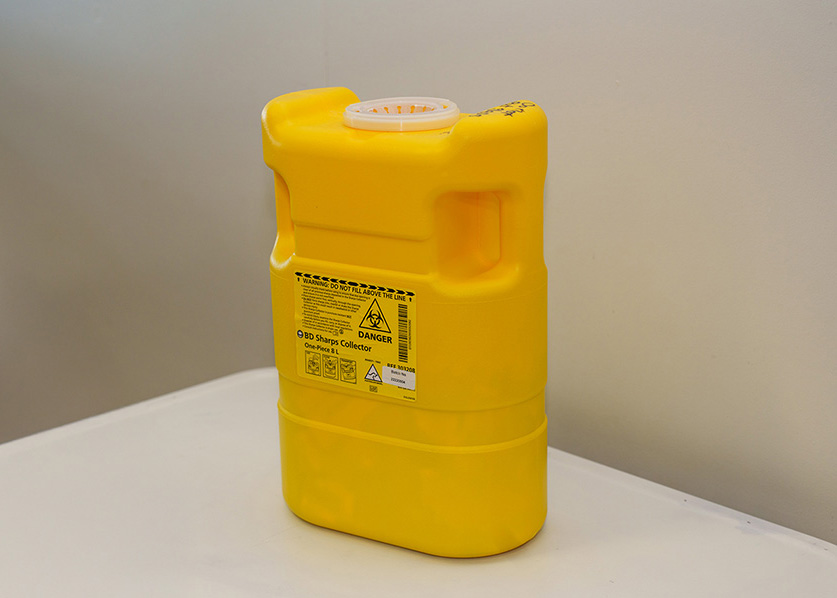
Contaminated waste should be placed in leak-resistant biohazard bags, securely closed, and placed in labelled, leakproof, puncture-resistant containers in appropriate storage areas. Sharps containers are used to dispose of sharp items such as discarded tubes with small amounts of blood, scalpel blades, needles, and syringes.
Linen or soiled textiles, including bedding, towels, and patient or resident clothing, may be contaminated with pathogenic microorganisms. The risk of disease transmission is negligible if they are handled, transported, and laundered safely. It is recommended that items are not shaken or handled in a manner that would aerosolise microorganisms in the environment. Individual healthcare facility policy should be followed with the Australian guidelines for the prevention and control of infection (2019) suggesting the following principles be applied:
- Wear appropriate personal protective equipment (PPE) when handling soiled linen to protect skin and mucous membranes from exposure to blood and body fluids.
- Place used linen directly into an appropriate laundry receptacle at the point of use.
- Avoid rinsing or sorting used linen in patient-care areas, and do not wash it in domestic washing machines.
- Linen contaminated with body fluids should be placed in leak-proof laundry bags for safe transport.
- Perform hand hygiene immediately after handling used linen.
- Clean linen should be stored in a clean, dry location that protects it from contamination by aerosols, dust, moisture, and pests. It must be kept separate from used linen.
Transmission Based Precautions
Patients who have known or suspected infection or colonisation of highly transmissible pathogens will require additional transmission precautions, which are dependent on the route of transmission involved. A combination of additional precautions may be utilised. These include:
- Additional PPE such as gloves, apron/gowns. Surgical mask or P2 respirators, and protective eyewear
- Dedicated equipment
- Single room or cohorting of patients
- Enhanced cleaning and disinfection of patient environment
- Restricted transfer of patients within and between facilities (NHMRC, 2019).
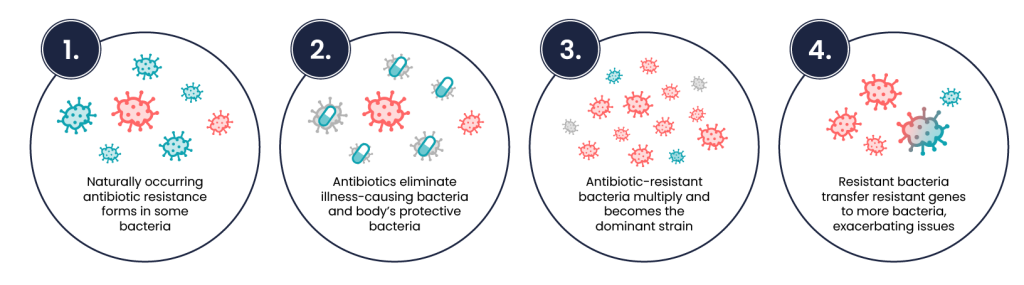
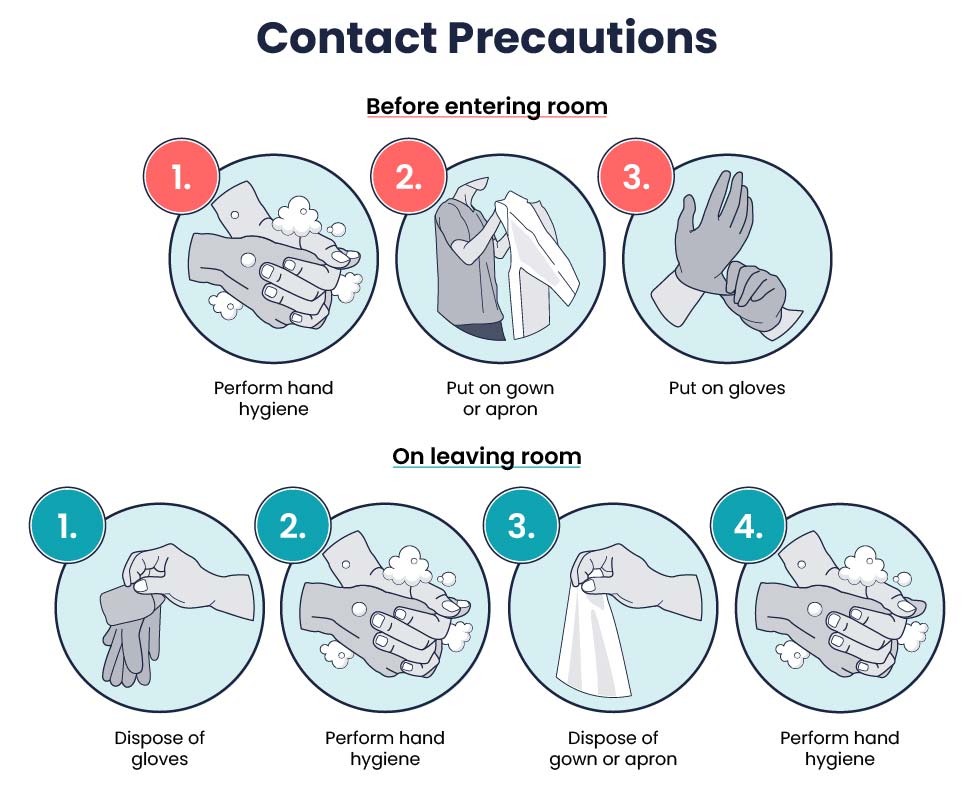
Contact Precautions
The use of contact precautions is indicated for patients who have known or suspected infections that can be transmitted through direct skin-to-skin contact or indirect contact with environmental surfaces or equipment. Patients in acute care should be placed in a single patient room if available. Cohorting of patients is recommended if a single room is not available. The following should be included in the care of the patient:
- Rooms/space needs to be clearly signed.
- Patient notes/charts are kept outside the room/space.
- PPE should be applied before entering the room/space.
- Standard precautions continue, and glove change/hand hygiene is required between multiple tasks on the same patient.
- PPE should be removed and hand hygiene performed before leaving the patient room/space.
- Hands should be disinfected before documenting in the chart.
The PPE needed when treating patients in contact isolation includes gloves and an isolation gown whenever touching the patient. Disposable or dedicated patient equipment should be used for the patient. When it is unavoidable to utilise common-use equipment, ensure it has been properly cleaned and disinfected before use on another patient.
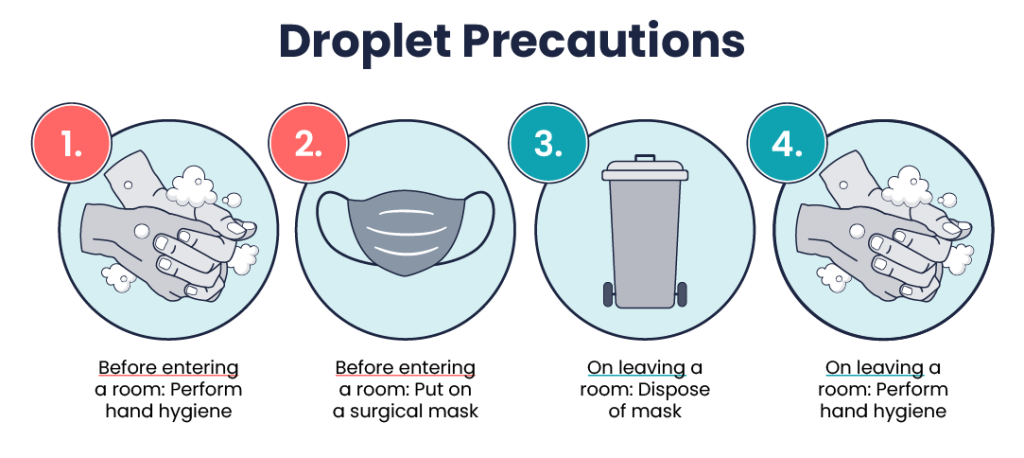
Droplet Precautions
Droplet precautions are implemented when patients are known or suspected to be infected with pathogens transmitted by respiratory droplets from coughing, sneezing, and talking. They are intended for infectious agents that are spread through close respiratory or mucous membrane contact. Examples include influenza, norovirus, and meningococcus. Patients in acute care should be placed in a single patient room if available. Cohorting of patients is recommended if a single room is not available. The following should be included in the care of the patient:
- The room/space needs to be clearly signed.
- The surgical mask should be worn upon entry to the patient space.
- Hand hygiene should occur before applying the mask and upon removal.
- Respiratory hygiene and cough etiquette should be explained to patients.
- Gloves and gown are worn as per standard precautions.
- If a patient on droplet precautions requires an aerosol-generating procedure, the precaution should be raised to airborne. If cohorted, the patient should be moved to the treatment room for the duration of the procedure (NHMRC, 2019).
- If transport outside the room is necessary, the patient should wear a surgical mask.
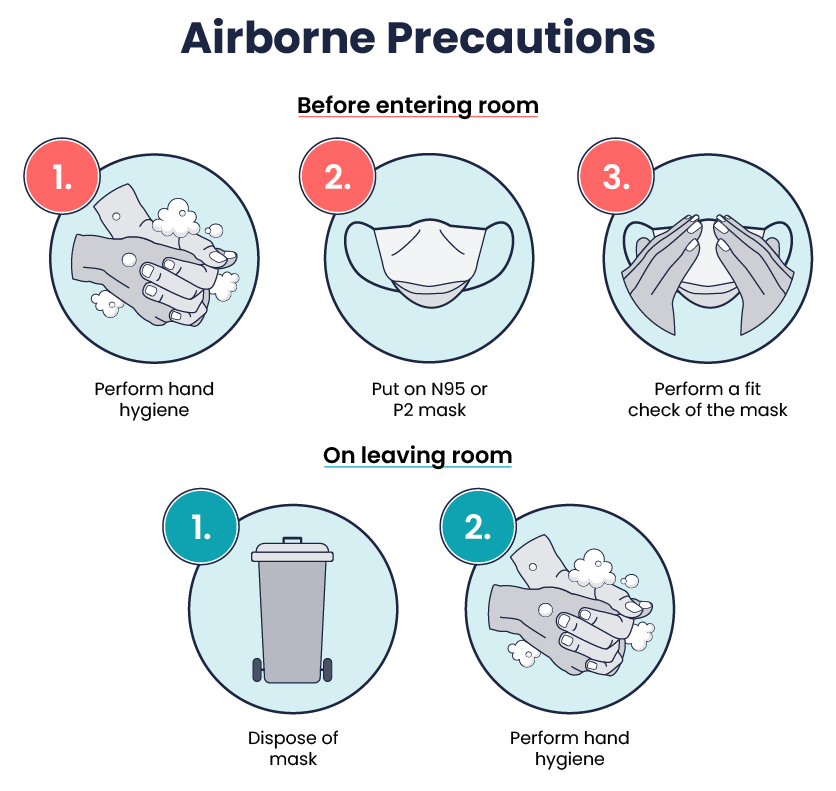
Airborne Precautions
When a patient is known or suspected to be infected with pathogens transmitted through droplet nuclei, airborne precautions should be used. Patients on airborne precautions, such as those being treated for Pulmonary Tuberculosis (TB), chicken pox, or measles, should be placed in negative pressure rooms. If a negative pressure room is unavailable, the patient should be masked and placed in a private room with the door closed.
- Rooms need to be clearly signed.
- Hand hygiene should occur before entering and leaving the room.
- A fit-tested P2/NP5 respirator should be applied before entry into the patient’s room.
- The fit-tested P2/NP5 respirator should be removed after exiting the patient’s room.
- Respiratory hygiene and cough etiquette should be explained to patients.
- Gloves and gown are worn as per standard precautions.
- The door should remain closed in the negative pressure room.
- If transport outside the room is necessary, the patient should wear a surgical mask (NHMRC, 2019).
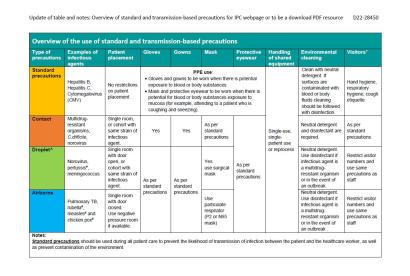
Use of Standard and Transmission-Based Precautions
Key Takeaways
In this chapter, we covered:
- Nurses play an essential role in the prevention of infectious diseases and therefore it is crucial for nurses to understand how infectious diseases spread.
- Microorganisms’ potential to cause disease is dependent on the number of organisms, virulence of the organism, its ability to survive in the host and the susceptibility of the host.
- Six specific phases must be completed for an infection to develop. These six phases process known as the Chain of infection are infectious agent, reservoir, portal of exit, mode of transmission, portal of entry, and susceptible host. Breaking this chain at any point can stop the spread of infection.
- By understanding the conditions that foster the spread of infection, nurses can implement evidence-based interventions to break the cycle and stop the chain of infection. Nurses must thoroughly understand how to protect themselves and their patients from exposure to harmful pathogens.
- Routine practices and additional precautions are used to break or minimise the chain of infection.
- Standard precautions are applied to all people at all times, regardless of their diagnosis or presumed infection status. These standards provide a basic level of protection that reduces the transmission of organisms from one area to another.
- Additional precautions may be required to be implemented in circumstances in which standard precautions alone may not prevent the transmission of infection. These precautions include Contact precautions, Droplet precautions, and Airborne precautions.
- Hand Hygiene is one of the most important techniques in preventing and controlling transmission of infection.
- The aseptic technique is used to prevent contamination and transfer of pathogens to the patient from healthcare worker hands, surfaces, and equipment during routine care or procedures that are considered part of standard precautions.
References
Australian Commission on Safety and Quality in Health Care. (2018). Healthcare-associated infections. https://www.safetyandquality.gov.au/sites/default/files/migrated/Healthcare-associated-infection-detailed-fact-sheet.pdf
Australian Commission on Safety and Quality in Health Care. (2020). Antimicrobial stewardship clinical care standard (2020). https://www.safetyandquality.gov.au/publications-and-resources/resource-library/antimicrobial-stewardship-clinical-care-standard-2020
Australian Commission on Safety and Quality in Health Care. (2024). National hand hygiene initiative implementation guide. https://www.safetyandquality.gov.au/publications-and-resources/resource-library/national-hand-hygiene-initiative-implementation-guide
Mitchell, B. G., Shaban, R. Z., MacBeth, D., Wood C.-J., & Russo P. L. (2017). The burden of healthcare-associated infection in Australian hospitals: A systematic review of the literature. Infection, Disease & Health 22(3). https://doi.org/10.1016/j.idh.2017.07.001
National Health and Medical Research Council. (2019). Australian guidelines for the prevention and control of infection in healthcare. Commonwealth of Australia. https://www.nhmrc.gov.au/about-us/publications/australian-guidelines-prevention-and-control-infection-healthcare-2019
Shaban, R., Macbeth, D., Russo P., Mitchell, B. Pearce, J. & Viengkham, C. (2023). Healthcare-associated infections and infectious diseases in emergency care. In K. Curtis, M. Fry, B. Lord, C. Ramsden & R. Z. Shaban (Eds), Emergency and trauma care for nurses and paramedics (4th ed., pp. 683-707). Elsevier Australia.
Chapter Attribution
This chapter has been adapted in parts from:
Nursing fundamentals 2e (n.d.) by Open Resources for Nursing, Chippewa Valley Technical College, is used under a CC BY licence.
Nursing skills 2e (2023) by Open Resources for Nursing, Chippewa Valley Technical College, is used under a CC BY licence.
Media Attributions
- Four Stages of Infection © Rice University & OpenStax adapted by Eileen Siddins is licensed under a CC BY (Attribution) license
- How Antibiotic Resistance Happens © Eileen Siddins is licensed under a CC BY-NC (Attribution NonCommercial) license
- Standard Precaution Signs © Australian Commission on Safety and Quality in Health is licensed under a CC BY-NC-ND (Attribution NonCommercial NoDerivatives) license
- Standard Safety Precautions © Eileen Siddins is licensed under a CC BY-NC (Attribution NonCommercial) license
- WHO Handrub Poster © World Health Organization is licensed under a CC BY-NC-SA (Attribution NonCommercial ShareAlike) license
- WHO Handwash Poster © World Health Organization is licensed under a CC BY-NC-SA (Attribution NonCommercial ShareAlike) license
- Gloves © Ben Green is licensed under a CC BY-NC (Attribution NonCommercial) license
- Donning Non-Sterile Gloves © Eileen Siddins is licensed under a CC BY-NC (Attribution NonCommercial) license
- How To Remove Gloves © World Health Organization adapted by Eileen Siddins is licensed under a CC BY-NC-SA (Attribution NonCommercial ShareAlike) license
- Nurse in Gown © Ben Green is licensed under a CC BY-NC (Attribution NonCommercial) license
- Surgical Mask © Ben Green is licensed under a CC BY-NC (Attribution NonCommercial) license
- Mask Don’ts © Ben Green is licensed under a CC BY-NC (Attribution NonCommercial) license
- Donning Mask © Ben Green is licensed under a CC BY-NC (Attribution NonCommercial) license
- Face shield and N95 mask © Simon Davis/DFID is licensed under a CC BY (Attribution) license
- Sharps Container © Ben Green is licensed under a CC BY-NC (Attribution NonCommercial) license
- Contact Precautions © Eileen Siddins is licensed under a CC BY-NC (Attribution NonCommercial) license
- Droplet Precautions © Eileen Siddins is licensed under a CC BY-NC (Attribution NonCommercial) license
- Airborne Precautions © Eileen Siddins is licensed under a CC BY-NC (Attribution NonCommercial) license
- Transmission based precautions. Reproduced with permission from the Transmission based precautions, developed by the Australian Commission on Safety and Quality in Health Care (ACSQHC). ACSQHC: Sydney (2023) © Australian Commission on Safety and Quality in Health Care is licensed under a CC BY-NC-ND (Attribution NonCommercial NoDerivatives) license
The method that a pathogen uses to spread from one host to another
An infection that is acquired while receiving medical treatment in a healthcare facility
The discipline of stopping or preventing the spread of infectious agents
A single-celled organism that is microscopic in size and too small to be seen by the naked eye
